> ## Documentation Index
> Fetch the complete documentation index at: https://docs.sezzle.com/llms.txt
> Use this file to discover all available pages before exploring further.
# Using Direct Javascript SDK
The Javascript SDK can be used for a simple, lightweight integration, but it also includes an in-context mode which will host the Sezzle checkout in a modal iframe or pop-up window.
Create checkouts and capture payments with Sezzle.
Checkout in an iframe, pop-up window, or redirect to Sezzle.
Handle payment success, failure, or cancel with your Sezzle orders.
Render the Sezzle checkout button on your store.
## Include SDK code
Include the following script in the `` section of the page.
```html theme={"system"}
```
## Checkout Configuration
The first requirement to get started with the direct JavaScript SDK is to configure a new Checkout object.
### Configuration Options
```javascript theme={"system"}
const checkoutSdk = new Checkout({
mode: string,
publicKey: string,
apiMode: string,
apiVersion: string,
});
```
```javascript theme={"system"}
const checkoutSdk = new Checkout({
mode: "popup",
publicKey: "sz_pub_...",
apiMode: "sandbox",
apiVersion: "v2",
});
```
Available options: `popup`, `iframe`, `redirect`
If you use `iframe` mode, add `*.sezzle.com` to your site's Content Security Policy (CSP) allowlist so the Sezzle checkout iframe can load.
* **popup** (recommended): works out of the box for most browser-based SDK integrations.
* **iframe**: required when popups are blocked (e.g. inside a webview or embedded browser). Sezzle must enable iframe for your domain(s) first — submit your Merchant UUID and the domains to allow per environment (sandbox and production). For example: *please enable uat1.mysite.com, uat2.mysite.com in sandbox and [www.mysite.com](http://www.mysite.com), mysite.com in production*.
* **redirect**: supported but generally less useful with the SDK, since the SDK's value is the in-context checkout and window messaging.
Used when creating a checkout or capturing payment. Find your API keys at [https://dashboard.sezzle.com/merchant/settings/apikeys](https://dashboard.sezzle.com/merchant/settings/apikeys)
Environment in which the checkout is to be completed
Available options: `live`, `sandbox`
The version of the Sezzle Checkout API the SDK will call. Use `v2` unless directed otherwise.
Available options: `v2`
## Payment Option
This section covers how to present Sezzle as a payment method at checkout. Depending on your webpage's design, you might wish to display Sezzle as an alternative payment method (APM) button, a radio option in a list of payment methods, and/or as an alternative submission button. Below are some examples of how to implement the front-end component.
If you wish to use a different design from the options displayed below, please refer to our [Co-Branded Guidelines](https://sezzle.com/brand-assets/) for Approved Messaging and Sezzle logo acceptable use.
### Sezzle in Payment Methods Table
Below is an example of Sezzle as a payment method radio.
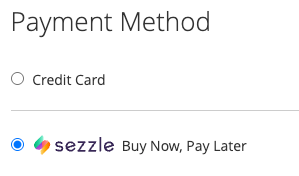 *This example snippet is for informational use only. Please follow the established HTML format of your existing payment methods.*
```html theme={"system"}
```
### Sezzle Button
The button option is available as a component of this SDK library. It is comprised of two parts: the configurable element plcaeholder and the render function.
#### Sezzle Button Configuration
Place the element snippet from the Template tab where you wish the Sezzle Button to be rendered on the page, then update the Options attributes as needed.
Sezzle as a button alongside other APMs
Sezzle as a Submit button as alternative to default button
```html theme={"system"}
```
```html theme={"system"}
```
Text to appear inside the button. Use `%%logo%%` inside the text to display the Sezzle image
The theme corresponds to your site's background color. If `theme`: `dark`, the button will be white with dark text. Else, the button will be dark purple with white text.
Available options: `dark`, `light`
Available options: `square`, `semi-rounded`
Custom classes to be applied
Blank space between the top of the content and the top edge of the button
Blank space between the bottom of the content and the bottom edge of the button
Blank space between the left side of the content and the left edge of the button
Blank space between the right side of the content and the right edge of the button
Width of the Sezzle logo within the button
CSS `top` offset for the Sezzle logo inside the button (e.g., `2px`).
CSS `bottom` offset for the Sezzle logo inside the button (e.g., `2px`).
CSS `left` offset for the Sezzle logo inside the button (e.g., `2px`).
CSS `right` offset for the Sezzle logo inside the button (e.g., `2px`).
Spacing between the templateText letters.
Width of the button
Height of the button.
#### Render the Sezzle Button
Add the following function to render the button when it is appropriate, such as when payment methods section loads, or when Sezzle is selected as a payment method. The parameter corresponds to the element created in the previous step.
```javascript theme={"system"}
checkoutSdk.renderSezzleButton("sezzle-smart-button-container");
```
## Initialize the Checkout
### Event Handlers
The SDK uses these event handlers to tell your site what's happening in the checkout. Implement each one to react to shopper actions like completing, cancelling, or running into an error.
```javascript theme={"system"}
checkoutSdk.init({
onClick: function () {
event.preventDefault();
checkoutSdk.startCheckout({...});
},
onComplete: function (response) {
console.log(response.data);
},
onCancel: function () {
console.log("Checkout cancelled.");
},
onFailure: function () {
console.log("Checkout failed.");
},
});
```
```javascript expandable theme={"system"}
checkoutSdk.init({
onClick: function () {
event.preventDefault();
checkoutSdk.startCheckout({
checkout_payload: {
order: {
intent: "AUTH",
reference_id: "543645yg5tg5675686",
description: "sezzle-store - #12749253509255",
order_amount: {
amount_in_cents: 10000,
currency: "USD",
},
},
},
});
},
onComplete: function (response) {
alert("Completed transaction. Capture started.");
checkoutSdk
.capturePayment(response.data.order_uuid, {
capture_amount: {
amount_in_cents: 10000,
currency: "USD",
},
partial_capture: false,
})
.then((r) => {
console.log(r);
});
},
onCancel: function () {
console.log("Checkout cancelled.");
},
onFailure: function () {
console.log("Checkout failed.");
},
});
```
Runs when the shopper clicks the Sezzle button.
Use this function to create the Sezzle checkout session and direct the shopper into that flow.
See [Checkout Initialization](#checkout-initialization) section for `startCheckout` payload options.
Runs when Sezzle checkout completes successfully. Use this to save the order and, if you used `intent: AUTH`, to capture the payment.
See [Capture Payment](#capture-payment) section for `capturePayment` payload options.
The checkout completion response
Checkout completion data
`"success"`
Checkout UUID
Session UUID
Order UUID
Origin URL of the checkout window
Runs when the shopper exits Sezzle checkout before completing payment. Use this to update the order status in your system.
The cancel event response
Cancel event data
`"cancel"`
The UUID of the checkout that failed
Session UUID
Order UUID
Origin URL of the checkout window
Runs when Sezzle checkout fails to load or hits an error. Use this to update the order status and surface the failure to the shopper.
The failure response
Error object or API error response. When `data` is an `Error`:
`"failure"`
The UUID of the checkout that failed
Session UUID
Order UUID
Error message (e.g., `"Public Key is missing."`)
Origin URL of the checkout window
### Checkout Initialization
```javascript theme={"system"}
checkoutSdk.startCheckout({
checkout_payload: {
order: {
intent: string,
reference_id: string,
description: string,
order_amount: {
amount_in_cents: integer,
currency: string,
},
},
},
});
```
```javascript theme={"system"}
checkoutSdk.startCheckout({
checkout_payload: {
order: {
intent: "AUTH",
reference_id: "543645yg5tg5675686",
description: "sezzle-store - #12749253509255",
order_amount: {
amount_in_cents: 10000,
currency: "USD",
},
},
},
});
```
The `checkout_payload` schema mirrors the [Create Session](/docs/api/core/sessions/postv2session) request body. See that reference document for the full list of fields, types, and constraints.
Alternatively, start checkout by URL:
```javascript theme={"system"}
checkout.startCheckout({
checkout_url: "https://checkout.sezzle.com/?id=example",
});
```
The `startCheckout` method should be implemented in the checkout `onClick` handler. There are two ways to start checkout:
* **With a checkout payload** — pass the full session object inline (shown above). The cancel and complete URLs are optional for `iframe` and `popup` mode.
* **With an existing checkout URL** — call `startCheckout({ checkout_url })`. The SDK `mode` must match the `checkout_mode` you used when [creating the session](/docs/api/core/sessions/postv2session). For `iframe` and `popup`, include the parent window's `origin` in the cancel and complete URLs.
**Customer Tokenization:** the customer UUID isn't delivered through `onComplete`. To receive it, subscribe to the [customer.tokenized](/docs/api/core/webhooks/postv2webhooks#valid-webhook-events) webhook event.
### Checkout completed by Payload
```javascript theme={"system"}
function onCompleteHandler(event) {
var data = event.data || Object.create(null);
console.log("session data:", data.session_uuid, data.order_uuid);
}
checkout.init({
onComplete: onCompleteHandler,
});
```
### Checkout completed by URL
```javascript theme={"system"}
function onCompleteHandler(event) {
var data = event.data || Object.create(null);
console.log("checkout data:", data.checkout_uuid);
}
checkout.init({
onComplete: onCompleteHandler,
});
```
### Capture Payment
Skip this step if you used `CAPTURE` intent when starting the checkout — Sezzle captures the order automatically.
```javascript theme={"system"}
var payload = {
capture_amount: {
amount_in_cents: integer,
currency: string,
},
};
checkout.capturePayment(data.order_uuid, payload);
```
```javascript theme={"system"}
var payload = {
capture_amount: {
amount_in_cents: 5000,
currency: "USD",
},
};
checkout.capturePayment(data.order_uuid, payload);
```
The capture payment method requires two parameters, the `order_uuid` and the payload as detailed in the [Capture Amount By Order Object](/docs/api/core/orders/postv2capturebyorder).
The `capturePayment` request body mirrors the [Capture by Order](/docs/api/core/orders/postv2capturebyorder) request body. See that reference document for the full list of fields, types, and constraints.
## Installment Plan
```javascript theme={"system"}
const checkout = new Checkout({});
checkout.getInstallmentPlan(1000);
```
```json theme={"system"}
{
"schedule": string,
"totalInCents": integer,
"installments": [
{
"installment": integer,
"amountInCents": integer,
"dueDate": string
}
]
}
```
```json theme={"system"}
{
"schedule": "bi-weekly",
"totalInCents": 1000,
"installments": [
{
"installment": 1,
"amountInCents": 250,
"dueDate": "2020-10-14"
},
{
"installment": 2,
"amountInCents": 250,
"dueDate": "2020-10-28"
},
{
"installment": 3,
"amountInCents": 250,
"dueDate": "2020-11-11"
},
{
"installment": 4,
"amountInCents": 250,
"dueDate": "2020-11-25"
}
]
}
```
Payment cadence for installment plan
Total order amount in cents
Breakdown of each payment due
Number of installment in series
Installment amount in cents
Due date of the installment
This function will provide the installment details based on an amount in cents. An existing [checkout](#checkout-initialization) can be used, or a `checkout` without any configuration can also be used to quickly get installment details.
*This example snippet is for informational use only. Please follow the established HTML format of your existing payment methods.*
```html theme={"system"}
```
### Sezzle Button
The button option is available as a component of this SDK library. It is comprised of two parts: the configurable element plcaeholder and the render function.
#### Sezzle Button Configuration
Place the element snippet from the Template tab where you wish the Sezzle Button to be rendered on the page, then update the Options attributes as needed.
Sezzle as a button alongside other APMs
Sezzle as a Submit button as alternative to default button
```html theme={"system"}
```
```html theme={"system"}
```
Text to appear inside the button. Use `%%logo%%` inside the text to display the Sezzle image
The theme corresponds to your site's background color. If `theme`: `dark`, the button will be white with dark text. Else, the button will be dark purple with white text.
Available options: `dark`, `light`
Available options: `square`, `semi-rounded`
Custom classes to be applied
Blank space between the top of the content and the top edge of the button
Blank space between the bottom of the content and the bottom edge of the button
Blank space between the left side of the content and the left edge of the button
Blank space between the right side of the content and the right edge of the button
Width of the Sezzle logo within the button
CSS `top` offset for the Sezzle logo inside the button (e.g., `2px`).
CSS `bottom` offset for the Sezzle logo inside the button (e.g., `2px`).
CSS `left` offset for the Sezzle logo inside the button (e.g., `2px`).
CSS `right` offset for the Sezzle logo inside the button (e.g., `2px`).
Spacing between the templateText letters.
Width of the button
Height of the button.
#### Render the Sezzle Button
Add the following function to render the button when it is appropriate, such as when payment methods section loads, or when Sezzle is selected as a payment method. The parameter corresponds to the element created in the previous step.
```javascript theme={"system"}
checkoutSdk.renderSezzleButton("sezzle-smart-button-container");
```
## Initialize the Checkout
### Event Handlers
The SDK uses these event handlers to tell your site what's happening in the checkout. Implement each one to react to shopper actions like completing, cancelling, or running into an error.
```javascript theme={"system"}
checkoutSdk.init({
onClick: function () {
event.preventDefault();
checkoutSdk.startCheckout({...});
},
onComplete: function (response) {
console.log(response.data);
},
onCancel: function () {
console.log("Checkout cancelled.");
},
onFailure: function () {
console.log("Checkout failed.");
},
});
```
```javascript expandable theme={"system"}
checkoutSdk.init({
onClick: function () {
event.preventDefault();
checkoutSdk.startCheckout({
checkout_payload: {
order: {
intent: "AUTH",
reference_id: "543645yg5tg5675686",
description: "sezzle-store - #12749253509255",
order_amount: {
amount_in_cents: 10000,
currency: "USD",
},
},
},
});
},
onComplete: function (response) {
alert("Completed transaction. Capture started.");
checkoutSdk
.capturePayment(response.data.order_uuid, {
capture_amount: {
amount_in_cents: 10000,
currency: "USD",
},
partial_capture: false,
})
.then((r) => {
console.log(r);
});
},
onCancel: function () {
console.log("Checkout cancelled.");
},
onFailure: function () {
console.log("Checkout failed.");
},
});
```
Runs when the shopper clicks the Sezzle button.
Use this function to create the Sezzle checkout session and direct the shopper into that flow.
See [Checkout Initialization](#checkout-initialization) section for `startCheckout` payload options.
Runs when Sezzle checkout completes successfully. Use this to save the order and, if you used `intent: AUTH`, to capture the payment.
See [Capture Payment](#capture-payment) section for `capturePayment` payload options.
The checkout completion response
Checkout completion data
`"success"`
Checkout UUID
Session UUID
Order UUID
Origin URL of the checkout window
Runs when the shopper exits Sezzle checkout before completing payment. Use this to update the order status in your system.
The cancel event response
Cancel event data
`"cancel"`
The UUID of the checkout that failed
Session UUID
Order UUID
Origin URL of the checkout window
Runs when Sezzle checkout fails to load or hits an error. Use this to update the order status and surface the failure to the shopper.
The failure response
Error object or API error response. When `data` is an `Error`:
`"failure"`
The UUID of the checkout that failed
Session UUID
Order UUID
Error message (e.g., `"Public Key is missing."`)
Origin URL of the checkout window
### Checkout Initialization
```javascript theme={"system"}
checkoutSdk.startCheckout({
checkout_payload: {
order: {
intent: string,
reference_id: string,
description: string,
order_amount: {
amount_in_cents: integer,
currency: string,
},
},
},
});
```
```javascript theme={"system"}
checkoutSdk.startCheckout({
checkout_payload: {
order: {
intent: "AUTH",
reference_id: "543645yg5tg5675686",
description: "sezzle-store - #12749253509255",
order_amount: {
amount_in_cents: 10000,
currency: "USD",
},
},
},
});
```
The `checkout_payload` schema mirrors the [Create Session](/docs/api/core/sessions/postv2session) request body. See that reference document for the full list of fields, types, and constraints.
Alternatively, start checkout by URL:
```javascript theme={"system"}
checkout.startCheckout({
checkout_url: "https://checkout.sezzle.com/?id=example",
});
```
The `startCheckout` method should be implemented in the checkout `onClick` handler. There are two ways to start checkout:
* **With a checkout payload** — pass the full session object inline (shown above). The cancel and complete URLs are optional for `iframe` and `popup` mode.
* **With an existing checkout URL** — call `startCheckout({ checkout_url })`. The SDK `mode` must match the `checkout_mode` you used when [creating the session](/docs/api/core/sessions/postv2session). For `iframe` and `popup`, include the parent window's `origin` in the cancel and complete URLs.
**Customer Tokenization:** the customer UUID isn't delivered through `onComplete`. To receive it, subscribe to the [customer.tokenized](/docs/api/core/webhooks/postv2webhooks#valid-webhook-events) webhook event.
### Checkout completed by Payload
```javascript theme={"system"}
function onCompleteHandler(event) {
var data = event.data || Object.create(null);
console.log("session data:", data.session_uuid, data.order_uuid);
}
checkout.init({
onComplete: onCompleteHandler,
});
```
### Checkout completed by URL
```javascript theme={"system"}
function onCompleteHandler(event) {
var data = event.data || Object.create(null);
console.log("checkout data:", data.checkout_uuid);
}
checkout.init({
onComplete: onCompleteHandler,
});
```
### Capture Payment
Skip this step if you used `CAPTURE` intent when starting the checkout — Sezzle captures the order automatically.
```javascript theme={"system"}
var payload = {
capture_amount: {
amount_in_cents: integer,
currency: string,
},
};
checkout.capturePayment(data.order_uuid, payload);
```
```javascript theme={"system"}
var payload = {
capture_amount: {
amount_in_cents: 5000,
currency: "USD",
},
};
checkout.capturePayment(data.order_uuid, payload);
```
The capture payment method requires two parameters, the `order_uuid` and the payload as detailed in the [Capture Amount By Order Object](/docs/api/core/orders/postv2capturebyorder).
The `capturePayment` request body mirrors the [Capture by Order](/docs/api/core/orders/postv2capturebyorder) request body. See that reference document for the full list of fields, types, and constraints.
## Installment Plan
```javascript theme={"system"}
const checkout = new Checkout({});
checkout.getInstallmentPlan(1000);
```
```json theme={"system"}
{
"schedule": string,
"totalInCents": integer,
"installments": [
{
"installment": integer,
"amountInCents": integer,
"dueDate": string
}
]
}
```
```json theme={"system"}
{
"schedule": "bi-weekly",
"totalInCents": 1000,
"installments": [
{
"installment": 1,
"amountInCents": 250,
"dueDate": "2020-10-14"
},
{
"installment": 2,
"amountInCents": 250,
"dueDate": "2020-10-28"
},
{
"installment": 3,
"amountInCents": 250,
"dueDate": "2020-11-11"
},
{
"installment": 4,
"amountInCents": 250,
"dueDate": "2020-11-25"
}
]
}
```
Payment cadence for installment plan
Total order amount in cents
Breakdown of each payment due
Number of installment in series
Installment amount in cents
Due date of the installment
This function will provide the installment details based on an amount in cents. An existing [checkout](#checkout-initialization) can be used, or a `checkout` without any configuration can also be used to quickly get installment details.