> ## Documentation Index
> Fetch the complete documentation index at: https://docs.sezzle.com/llms.txt
> Use this file to discover all available pages before exploring further.
# Magento 2
This guide explains how to add Sezzle as a payment option on your Magento 2 website, enabling customers to use Sezzle at checkout.
Sezzle's Magento 2 extension is certified in the [marketplace](https://commercemarketplace.adobe.com/sezzle-sezzlepay.html) and can be downloaded from GitHub.
## Install the Sezzle Magento 2 Extension
Follow the instructions [here](https://github.com/sezzle/sezzle-magento2/tree/production) to install the Sezzle extension to your Magento setup
## Configure Sezzle
1. Log in to your Magento admin site
2. Go to `Stores` > `Configuration` > `Sales` > `Payment Methods` > `Additional Payment Solutions`
3. Next to `Sezzle`, click `Configure`
4. Click `I've already setup Sezzle, I want to edit my settings`
If you have not already signed up for Sezzle, you must [do so now](https://dashboard.sezzle.com/merchant/signup) before proceeding
### General
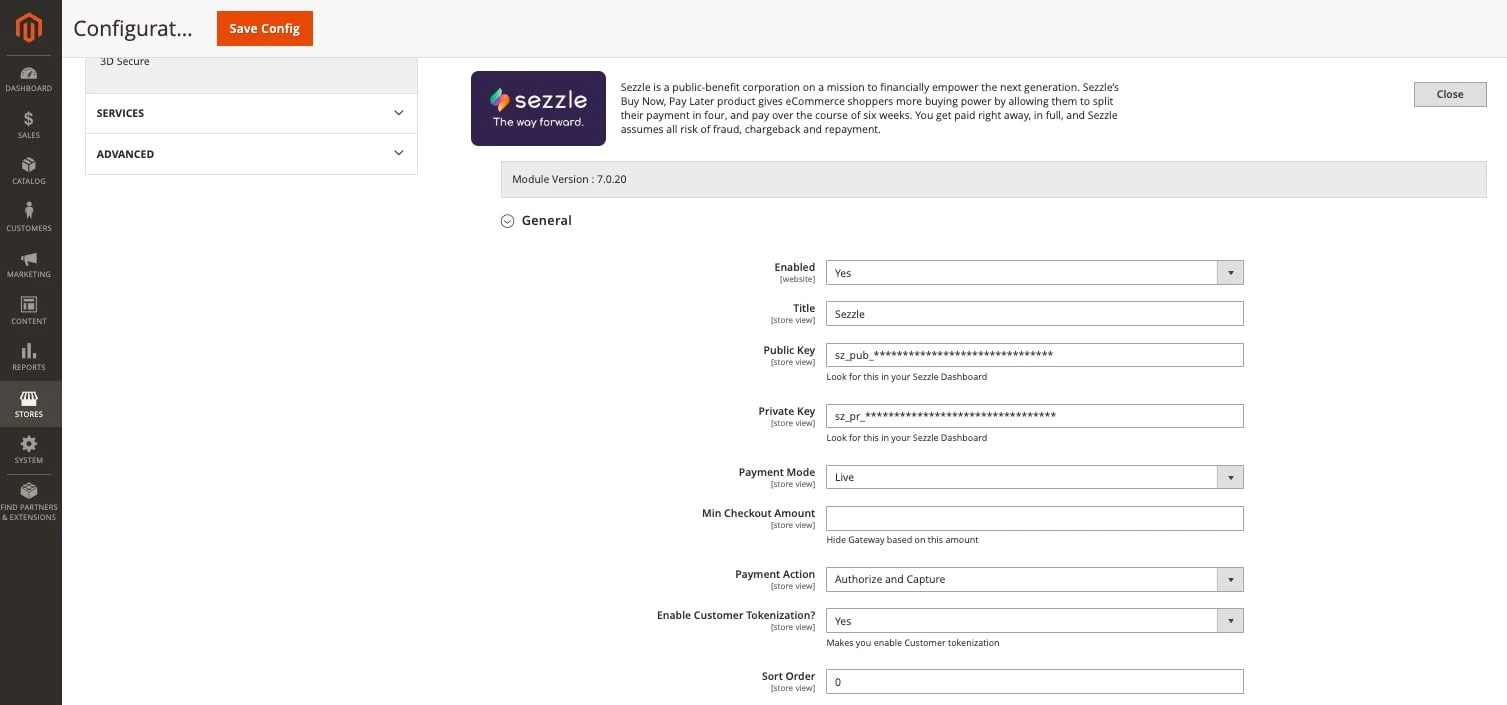
1. Set `Enabled` to `Yes`
2. Enter Public Key and Private Key, as found in your [Sezzle Merchant Dashboard](https://dashboard.sezzle.com/merchant/settings/apikeys)
3. Select the `Payment Mode: Live`
* See [Sandbox Testing](#sandbox-testing) for more information
4. Set `Min Checkout Amount` to restrict Sezzle payment method below the given amount
5. Select the `Payment Action`
* `Authorize Only` will only authorize payment and requires that the payment be captured later
* See [Capture Payment](#capture-payment) for manual capture instructions
* `Authorize and Capture` will perform both in a single step
* See [Authorize Only vs Authorize and Capture](/docs/guides/auth-and-capture) for details
6. Select `Enable Customer Tokenization`
* `Yes` prompts the customer to allow their account to be tokenized
* See [Customer tokenization](#customer-tokenization-details) for details
Customer Tokenization is currently unavailable
7. Set `Sort Order` to manage the position of Sezzle in the checkout payment options list
 ### In-Context Settings
In-Context Solution opens Sezzle payment processing in an iframe or pop-up. When disabled, shoppers will be redirected to Sezzle for payment processing, then returned to the merchant site upon completion.
* Set `Enable In-Context Solution` to `Yes` to enable In-Context Checkout.
* Set `In-Context Checkout Mode`
* `IFrame` will open Sezzle in a modal over the merchant site
* For security reasons, Sezzle must whitelist site URL(s) wishing to use this option.
* `Pop Up` will open Sezzle in a new window
* This option works without additional configuration from Sezzle's end.
### In-Context Settings
In-Context Solution opens Sezzle payment processing in an iframe or pop-up. When disabled, shoppers will be redirected to Sezzle for payment processing, then returned to the merchant site upon completion.
* Set `Enable In-Context Solution` to `Yes` to enable In-Context Checkout.
* Set `In-Context Checkout Mode`
* `IFrame` will open Sezzle in a modal over the merchant site
* For security reasons, Sezzle must whitelist site URL(s) wishing to use this option.
* `Pop Up` will open Sezzle in a new window
* This option works without additional configuration from Sezzle's end.
 ### Settlement Report Settings
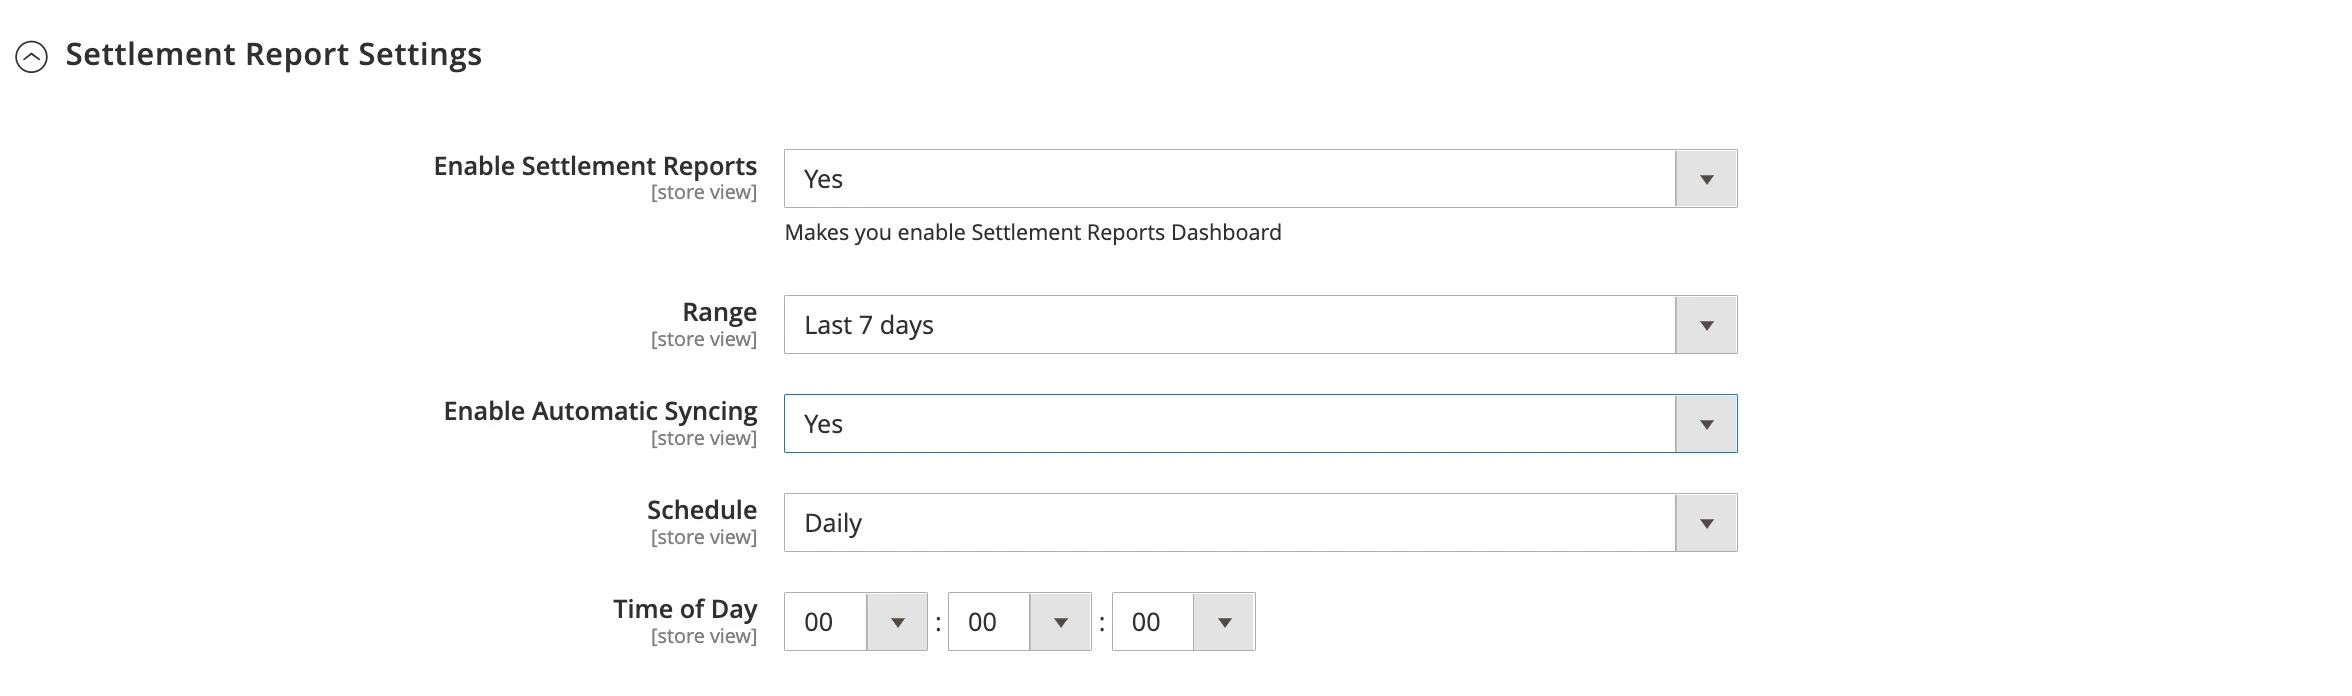
1. Set `Enable Settlement Reports` to `Yes` to enable the Settlement Reports Dashboard
* See [Settlement Reports](#settlement-reports) for details
2. Set `Range` to a value based on which you want to fetch the Settlement Reports
* Every time the Settlement Reports are fetched, this will be the default range for which to retrieve records
3. Set `Enable Automatic Syncing` to fetch the Settlement Reports asynchronously
* This requires `cron` to be enabled in Magento. In your Magento root folder, run `php bin/magento cron:run`
If Automatic Syncing is not enabled, the sync can still be triggered manually from the `Sezzle Settlement` page
4. Set `Schedule` to the frequency desired for the sync to occur
5. Set `Time of Day` for the automatic sync to run. This is based on UTC timezone.
### Settlement Report Settings
1. Set `Enable Settlement Reports` to `Yes` to enable the Settlement Reports Dashboard
* See [Settlement Reports](#settlement-reports) for details
2. Set `Range` to a value based on which you want to fetch the Settlement Reports
* Every time the Settlement Reports are fetched, this will be the default range for which to retrieve records
3. Set `Enable Automatic Syncing` to fetch the Settlement Reports asynchronously
* This requires `cron` to be enabled in Magento. In your Magento root folder, run `php bin/magento cron:run`
If Automatic Syncing is not enabled, the sync can still be triggered manually from the `Sezzle Settlement` page
4. Set `Schedule` to the frequency desired for the sync to occur
5. Set `Time of Day` for the automatic sync to run. This is based on UTC timezone.
 ### On-Site Messaging Widget Settings
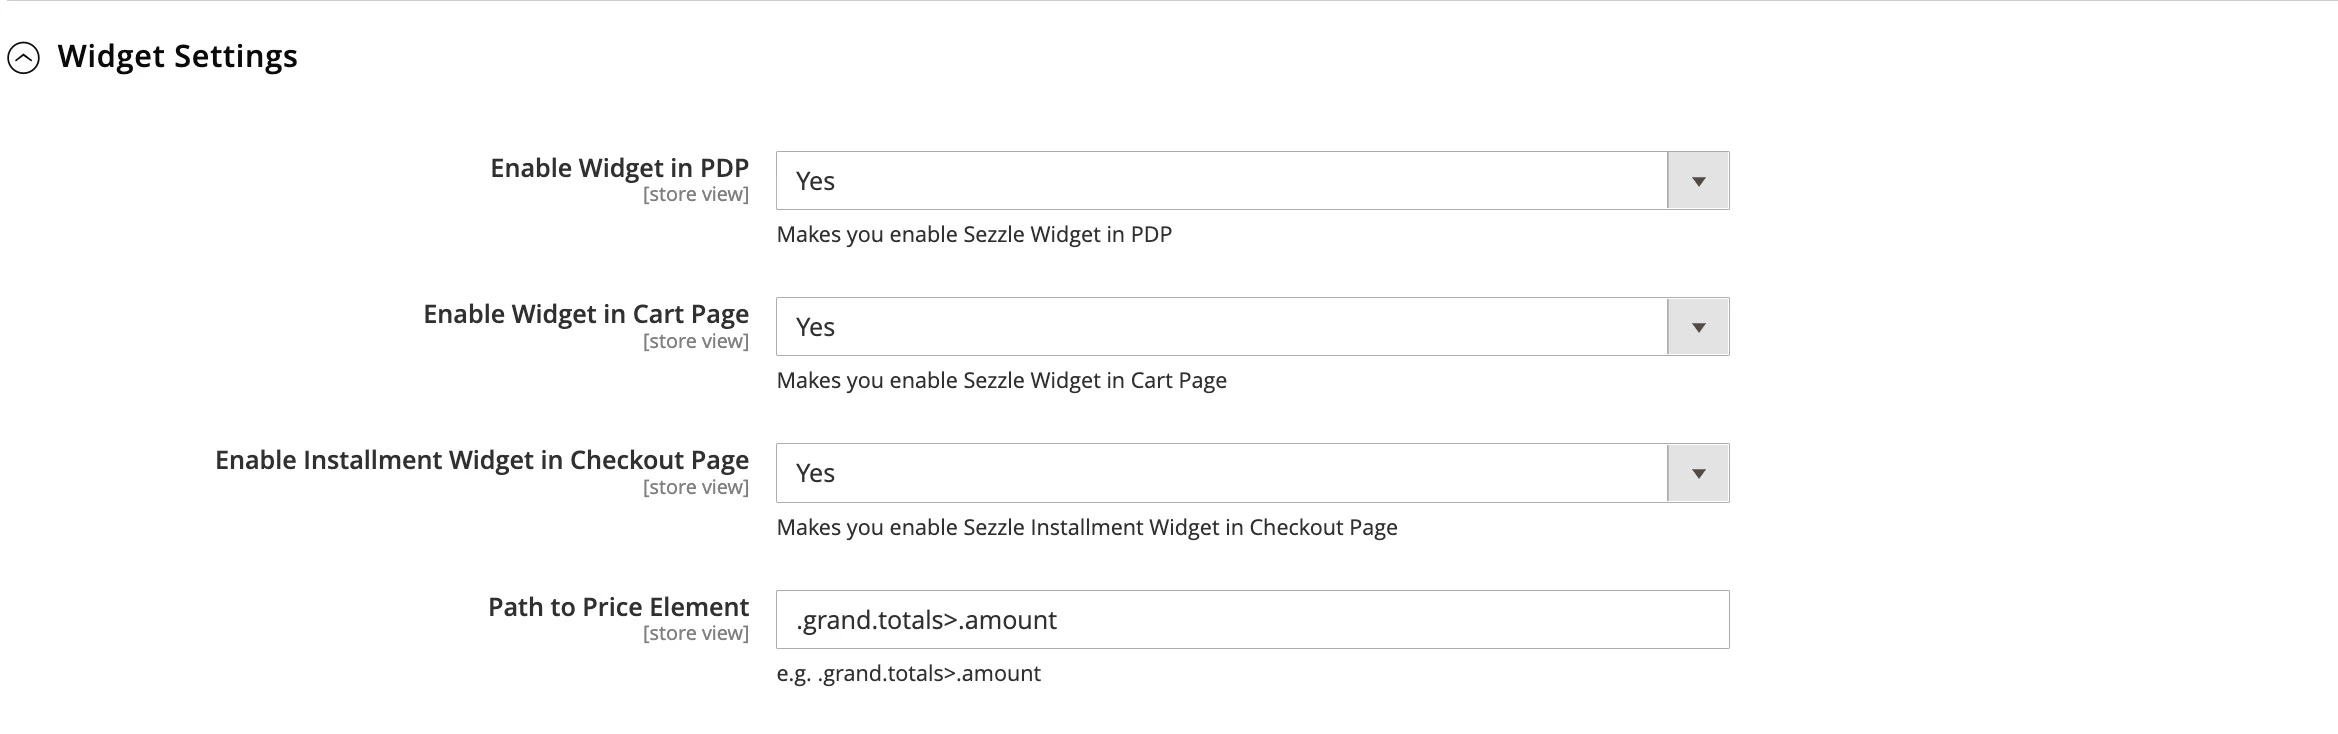
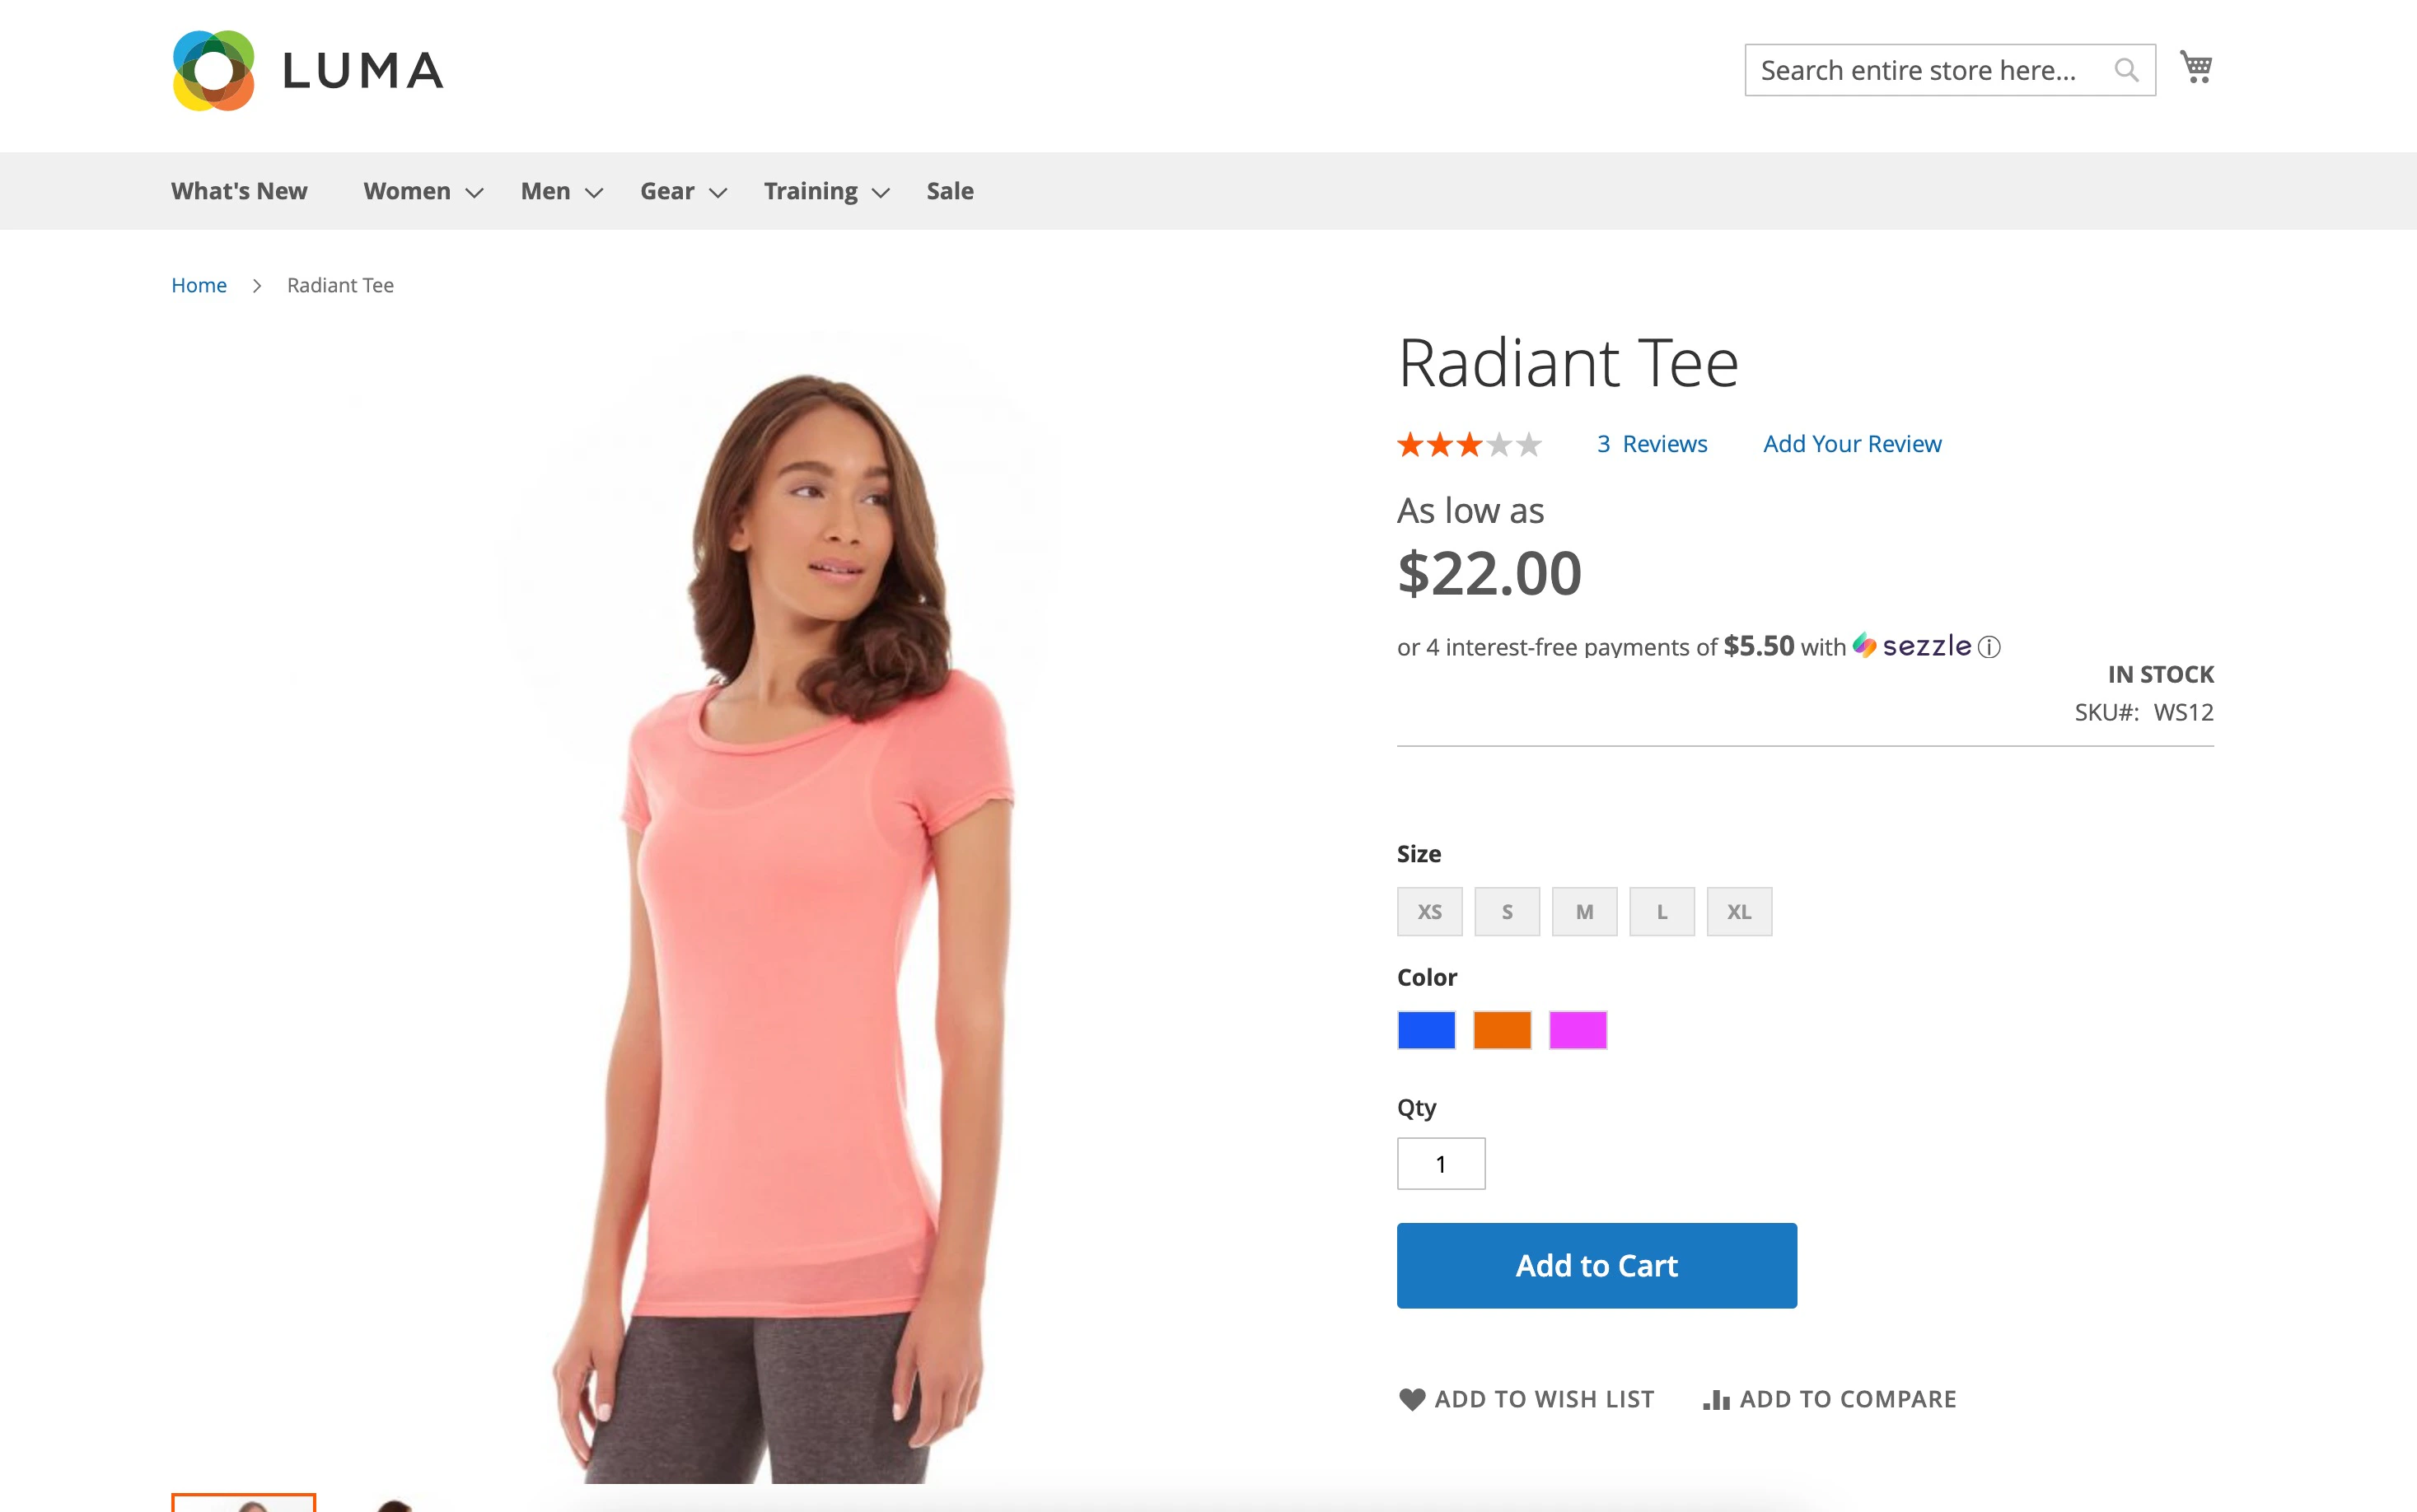
1. Set `Enable Widget in PDP` to `Yes` to display Sezzle on-site messaging after the product price on the Product Detail Page
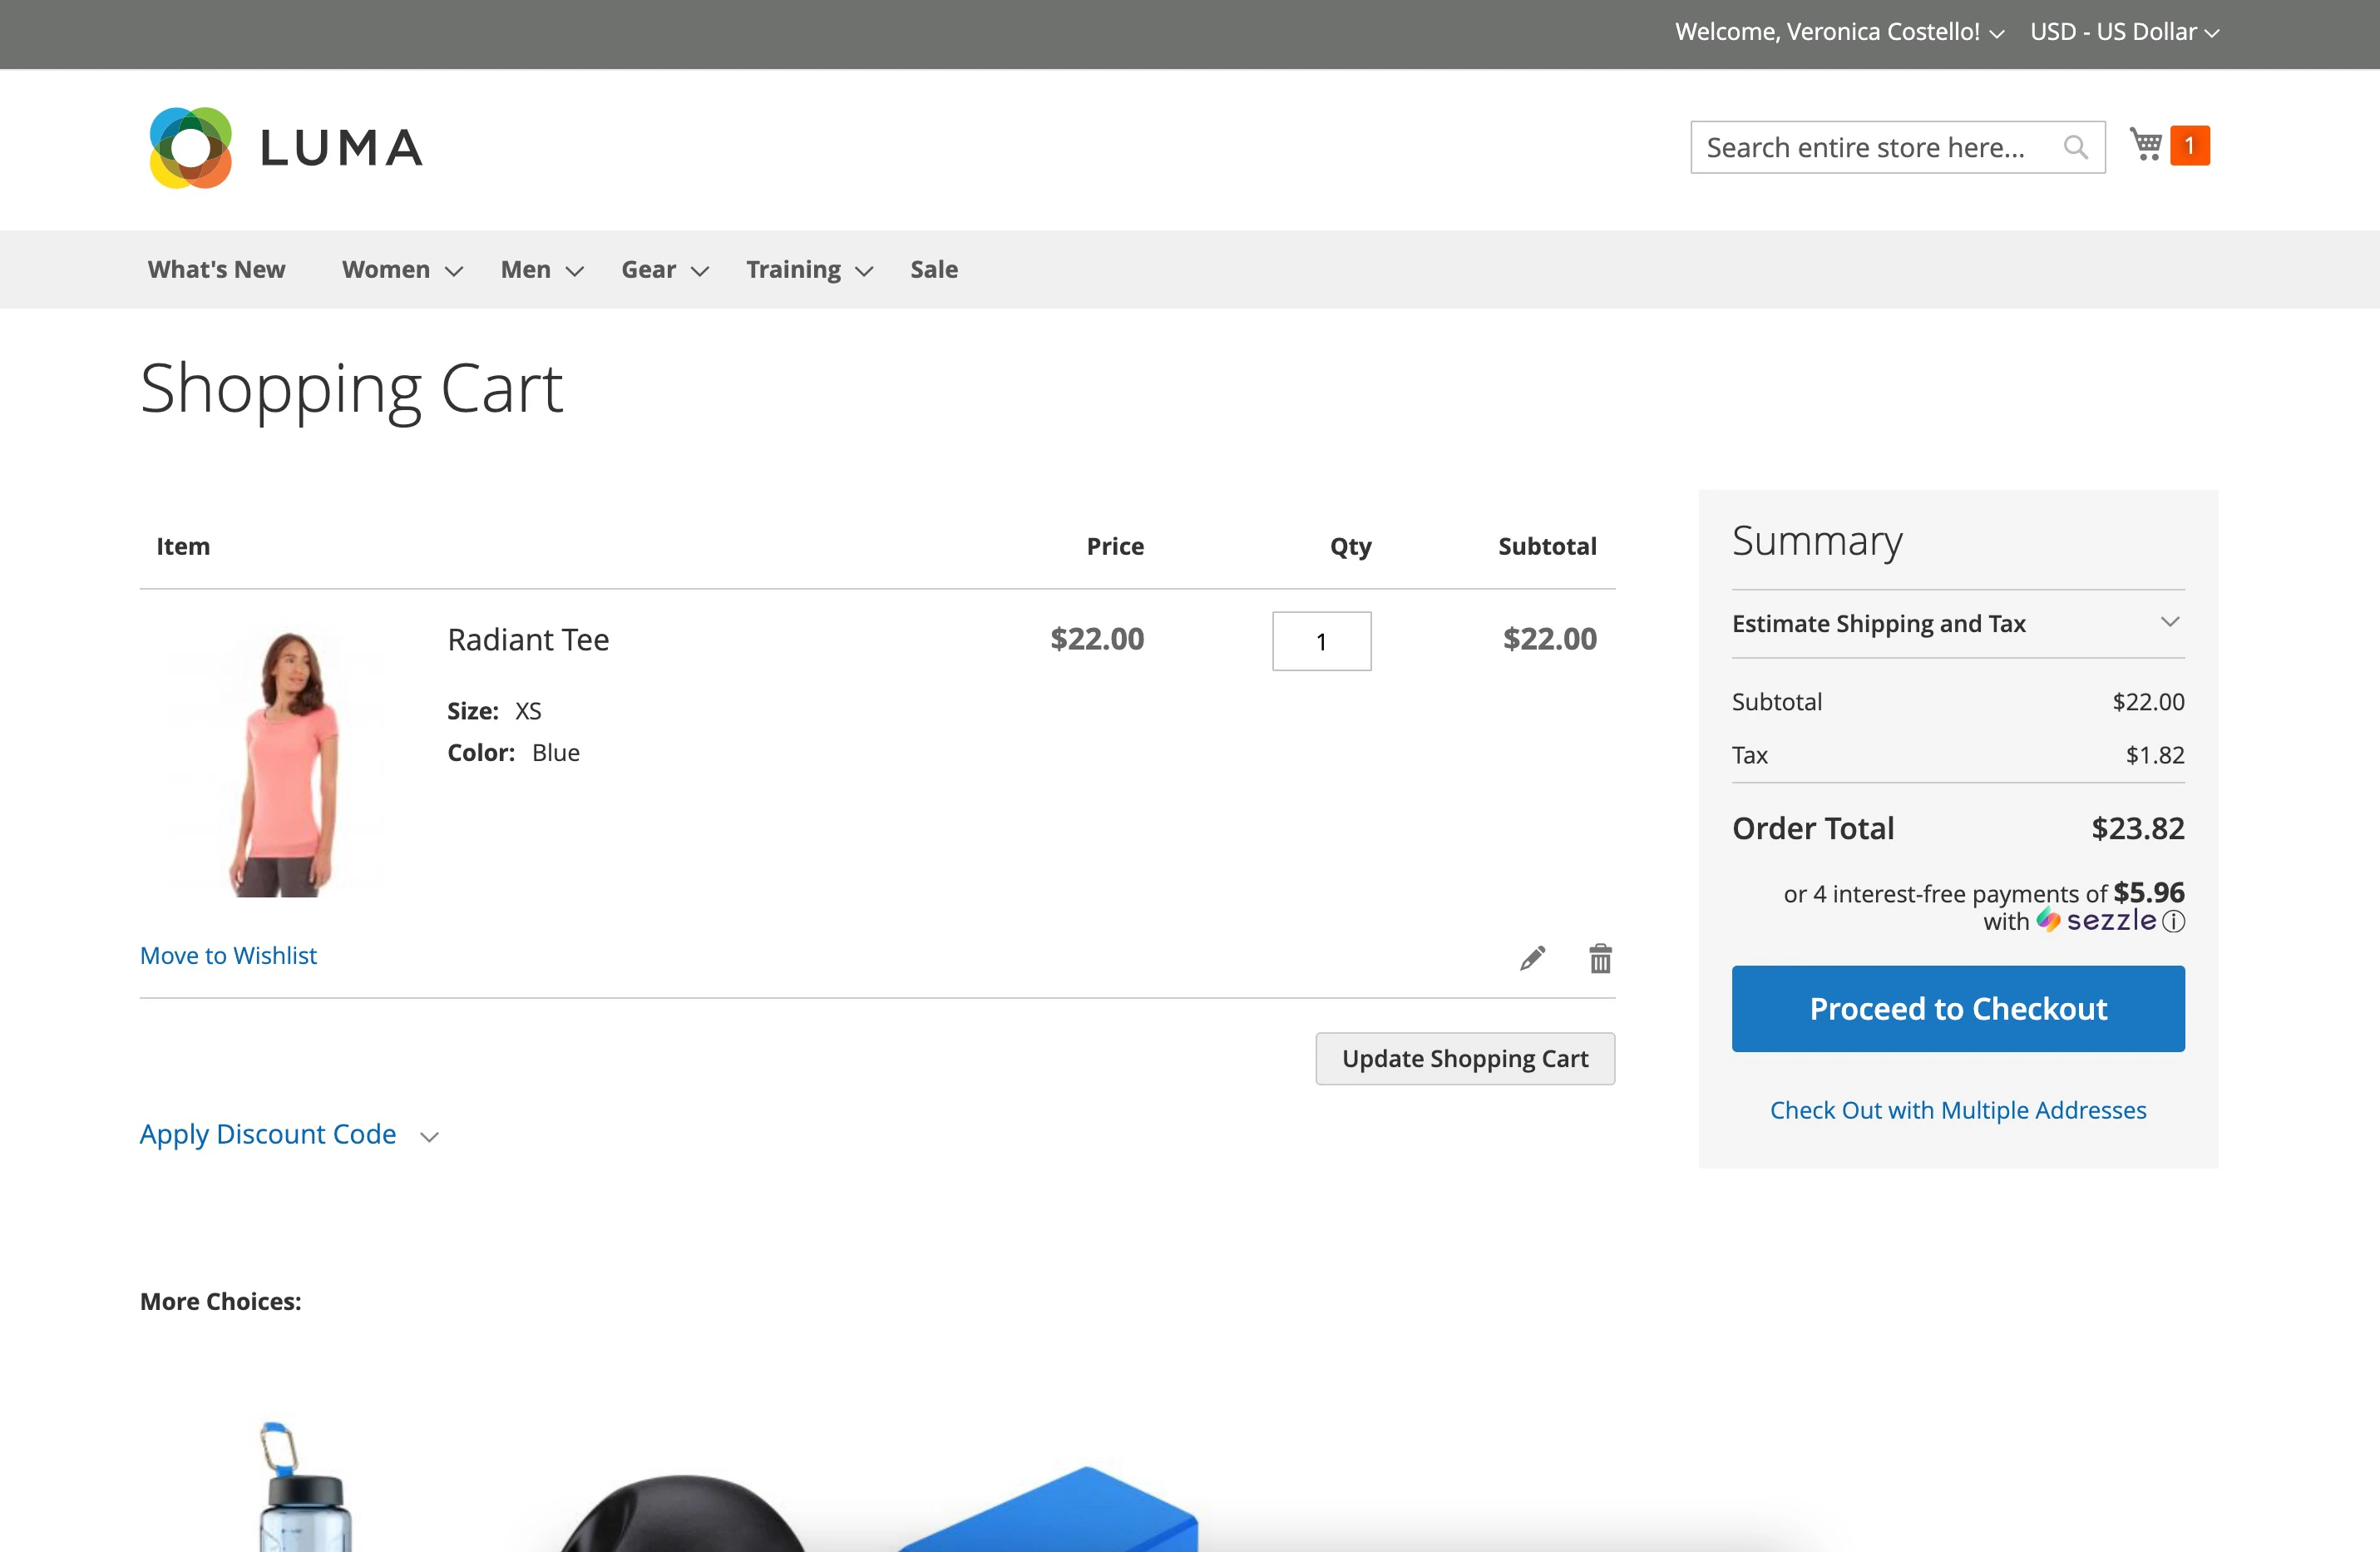
2. Set `Enable Widget in Cart Page` to `Yes` to display Sezzle on-site messaging after the cart total on the Cart Page
3. Set `Enable Installment Widget in Checkout Page` to `Yes` to show the Sezzle installment plan widget under the Sezzle payment option on the Checkout Page
4. Set `Path to Price Element` to define where in the Checkout Page the order total text value will be detected for the installment widget
5. Save the configuration and clear the cache
### On-Site Messaging Widget Settings
1. Set `Enable Widget in PDP` to `Yes` to display Sezzle on-site messaging after the product price on the Product Detail Page
2. Set `Enable Widget in Cart Page` to `Yes` to display Sezzle on-site messaging after the cart total on the Cart Page
3. Set `Enable Installment Widget in Checkout Page` to `Yes` to show the Sezzle installment plan widget under the Sezzle payment option on the Checkout Page
4. Set `Path to Price Element` to define where in the Checkout Page the order total text value will be detected for the installment widget
5. Save the configuration and clear the cache
 ### Widget Support
If widgets do not appear on the PDP and/or cart page after enabling the `Widget Settings`, click the `Request` button in this section to contact the Sezzle Widget team for assistance.
### Widget Support
If widgets do not appear on the PDP and/or cart page after enabling the `Widget Settings`, click the `Request` button in this section to contact the Sezzle Widget team for assistance.
 ### Developer Settings
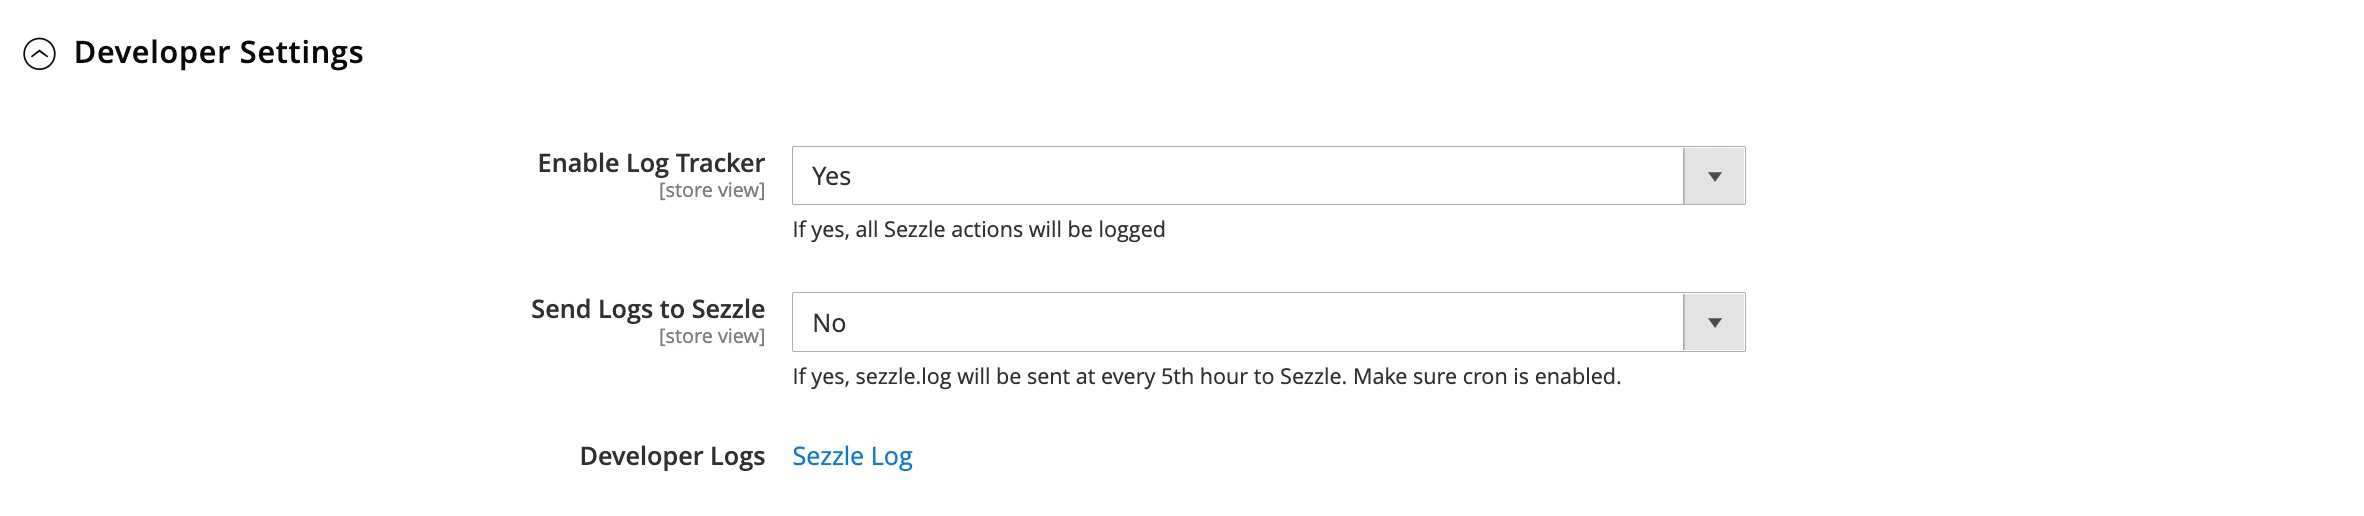
1. Set Enable Log Tracker to Yes to trace the Sezzle checkout process
2. Set Send Logs to Sezzle to Yes to send the logs to Sezzle automatically
* This requires `cron` to be enabled in Magento. In your Magento root folder, run `php bin/magento cron:run`
* If this feature is disabled, please provide a copy of the logs with any support request related to the request.
3. You may download the latest logs any time by clicking on Developer Logs: Sezzle Log
This button will only download the log file for the current date. To retrieve logs for a past date, go to `/var/log/sezzlepay-YYYY-MM-DD.log`
### Developer Settings
1. Set Enable Log Tracker to Yes to trace the Sezzle checkout process
2. Set Send Logs to Sezzle to Yes to send the logs to Sezzle automatically
* This requires `cron` to be enabled in Magento. In your Magento root folder, run `php bin/magento cron:run`
* If this feature is disabled, please provide a copy of the logs with any support request related to the request.
3. You may download the latest logs any time by clicking on Developer Logs: Sezzle Log
This button will only download the log file for the current date. To retrieve logs for a past date, go to `/var/log/sezzlepay-YYYY-MM-DD.log`
 ### Clearing the Cache
1. Navigate to `System` > `Cache Management`
2. Click `Flush Cache Storage`
* Your store is now ready to accept payments through Sezzle
## Sezzle Order Management
### Sandbox Testing
Customer tokenization is currently unavailable.
1. On your dev/staging site, go to `Stores` > `Configuration` > `Sales` > `Payment Methods` > `Additional Payment Solutions`
2. Next to `Sezzle`, click `Configure`
3. Under `General`, update `Payment Mode to Sandbox`
4. Replace Public Key and Private Key with the API keys from your [Sezzle Merchant Sandbox Dashboard](https://dashboard.sezzle.com/merchant/settings/apikeys)
5. Click `Save Config`
6. On your website, add an item to the cart, then proceed to checkout and select Sezzle as the payment method
1. If customer is not tokenized, click `Continue to Sezzle`
2. If customer is tokenized, click `Place Order`
3. If In-Context checkout, click `Pay with Sezzle`
7. Sign In to Sezzle or Sign Up to continue
8. Enter the payment details using [test data](https://docs.sezzle.com/docs/api/test-cards#checkout-testing), then proceed to the final page
9. If customer is tokenized, check the `Approve {Website Name}` to process payments from your Sezzle account for future transactions
You may revoke this authorization at any time in your Sezzle Dashboard to tokenize your account
10. If your account is already tokenized, order will be placed without redirection
11. After payment is completed at Sezzle, you will be directed to your site's Successful Payment page
Sandbox testing is complete. You may login to your Sezzle Merchant Sandbox Dashboard to see the test order you just placed.
### Capture Payment
* The capture will be performed instantly from the extension after the order is created and validated in Magento.
* You will need to capture the payment manually from the Magento admin using the following steps:
1. 1. Navigate to `Sales` > `Orders`, find the order to capture, and click `View`
2. 2. In the upper-right of the form, click `Invoice`
3. 3. Review the order details, then click `Submit Invoice`
This will capture the payment in Sezzle and update the Magento order status to Processing
### Refund Payment
1. Navigate to `Sales` > `Orders`, find the order to refund, and click `View`
2. In the left toolbar, click `Invoices`, find the order to refund, and click `View`
3. In the upper-right of the form, click `Credit Memo` then `OK` to confirm your action
4. Review the refund details, then click `Refund`
This will refund the payment amount in Sezzle and update the Magento order status to Closed
### Release Payment
1. Navigate to `Sales` > `Orders`, find the order to release, and click `View`
2. In the upper-right of the form, click `Cancel` or `Void` then `OK` to confirm your action
This will release the payment amount in Sezzle and update the Magento order status to Canceled if the Sezzle authorization has been released successfully or has already expired
According to Magento, `Void` should be used to release the current payment authorization and a new invoice can be generated, whereas `Cancel` both voids the authorization and places the order into a read-only state.
However, in Sezzle's case, both buttons operate the same way
### Order Verification in Magento Admin
1. Log in to Magento admin
2. Navigate to `Sales` > `Orders`, find the order to verify, and click `View`
| Order Status | Total Paid | Description |
| :----------- | :------------------------- | :------------------------------------------ |
| Processing | Grand Total | Payment was successfully captured by Sezzle |
| Pending | Does not equal Grand Total | Payment is authorized but not captured yet |
| Closed | N/A | Payment has been refunded |
| Canceled | N/A | Payment has been released |
### Order Verification in Sezzle Merchant Dashboard
1. Log in to Sezzle Merchant Dashboard
2. Navigate to `Orders`, then find and click the order to verify
| Order Status | Description |
| :----------------------------------------------------------- | :----------------------------------------------------------------------------------------------------- |
| Approved | Payment was successfully captured by Sezzle |
| Authorized, uncaptured | Payment was authorized but not captured yet |
| Refunded | Payment was refunded |
| Deleted due to checkout not being captured before expiration | Either the payment was not captured before the authorization expired, or the payment has been released |
### Customer Tokenization Details
Customer tokenization is currently unavailable.
Tokenized orders will always be pay-in-full.
1. Navigate to `Customers` > `All Customers`
* Select the customer to view tokenization details
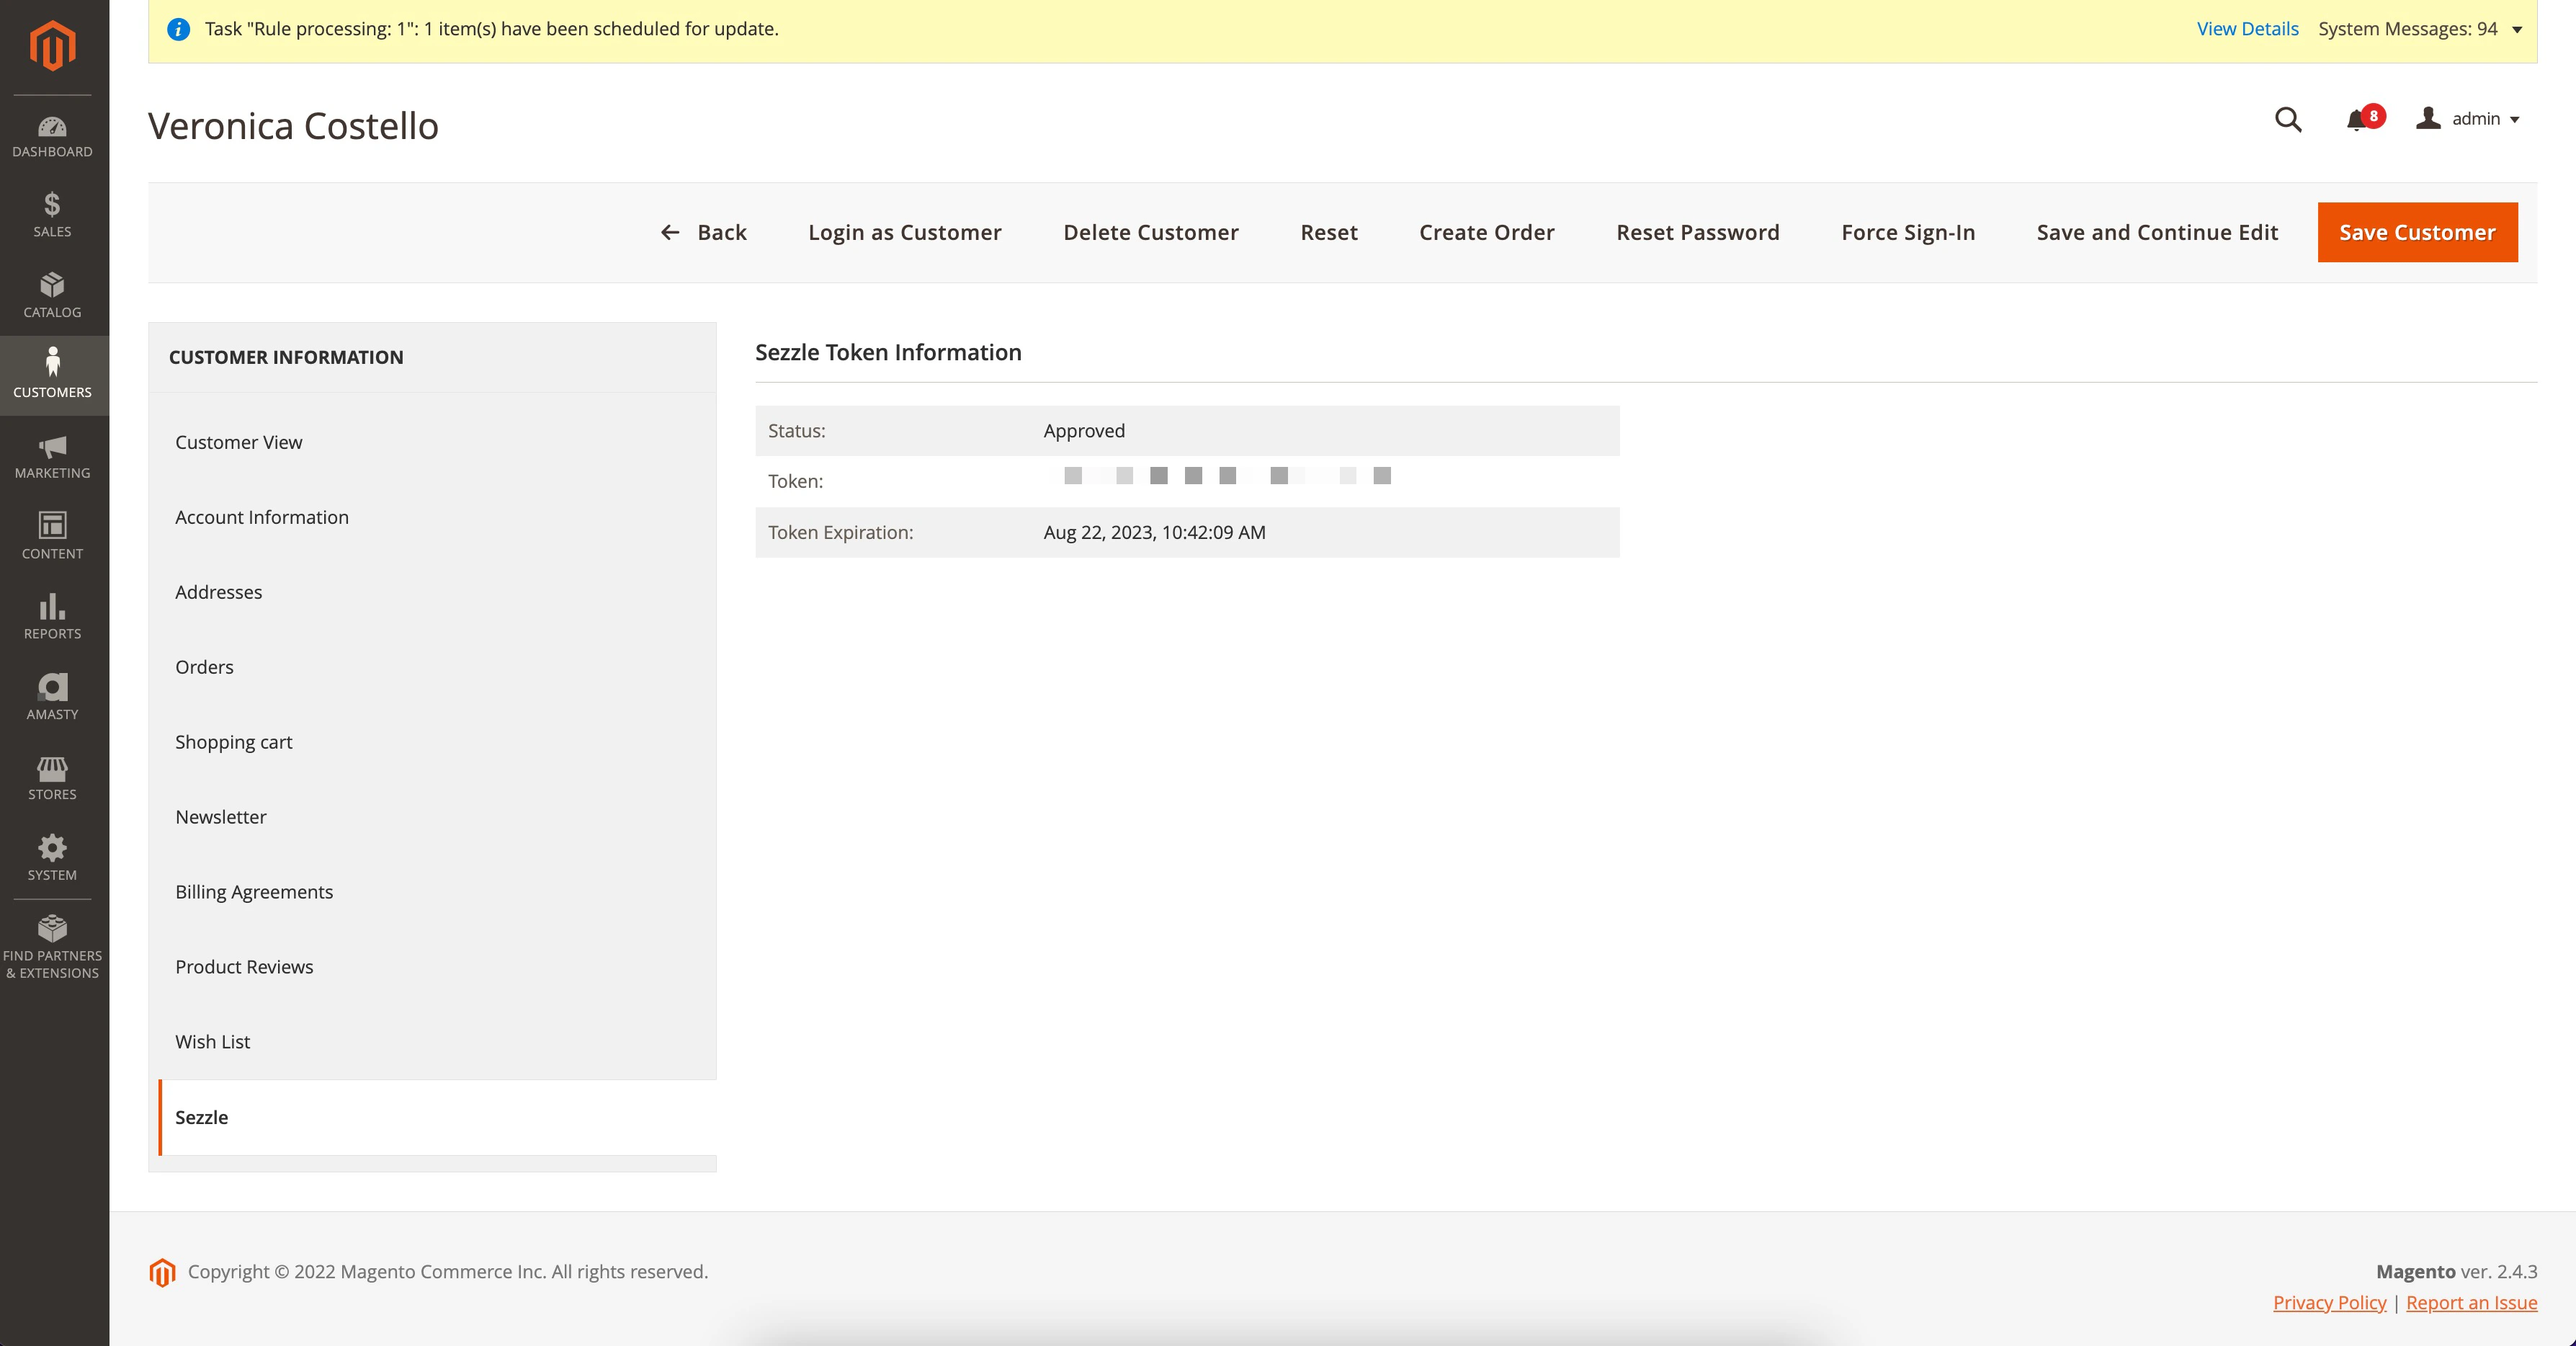
2. If the customer is tokenized, the Sezzle tab will appear
* The `Status`, `Token`, and `Token Expiration` will appear on the tab
### Clearing the Cache
1. Navigate to `System` > `Cache Management`
2. Click `Flush Cache Storage`
* Your store is now ready to accept payments through Sezzle
## Sezzle Order Management
### Sandbox Testing
Customer tokenization is currently unavailable.
1. On your dev/staging site, go to `Stores` > `Configuration` > `Sales` > `Payment Methods` > `Additional Payment Solutions`
2. Next to `Sezzle`, click `Configure`
3. Under `General`, update `Payment Mode to Sandbox`
4. Replace Public Key and Private Key with the API keys from your [Sezzle Merchant Sandbox Dashboard](https://dashboard.sezzle.com/merchant/settings/apikeys)
5. Click `Save Config`
6. On your website, add an item to the cart, then proceed to checkout and select Sezzle as the payment method
1. If customer is not tokenized, click `Continue to Sezzle`
2. If customer is tokenized, click `Place Order`
3. If In-Context checkout, click `Pay with Sezzle`
7. Sign In to Sezzle or Sign Up to continue
8. Enter the payment details using [test data](https://docs.sezzle.com/docs/api/test-cards#checkout-testing), then proceed to the final page
9. If customer is tokenized, check the `Approve {Website Name}` to process payments from your Sezzle account for future transactions
You may revoke this authorization at any time in your Sezzle Dashboard to tokenize your account
10. If your account is already tokenized, order will be placed without redirection
11. After payment is completed at Sezzle, you will be directed to your site's Successful Payment page
Sandbox testing is complete. You may login to your Sezzle Merchant Sandbox Dashboard to see the test order you just placed.
### Capture Payment
* The capture will be performed instantly from the extension after the order is created and validated in Magento.
* You will need to capture the payment manually from the Magento admin using the following steps:
1. 1. Navigate to `Sales` > `Orders`, find the order to capture, and click `View`
2. 2. In the upper-right of the form, click `Invoice`
3. 3. Review the order details, then click `Submit Invoice`
This will capture the payment in Sezzle and update the Magento order status to Processing
### Refund Payment
1. Navigate to `Sales` > `Orders`, find the order to refund, and click `View`
2. In the left toolbar, click `Invoices`, find the order to refund, and click `View`
3. In the upper-right of the form, click `Credit Memo` then `OK` to confirm your action
4. Review the refund details, then click `Refund`
This will refund the payment amount in Sezzle and update the Magento order status to Closed
### Release Payment
1. Navigate to `Sales` > `Orders`, find the order to release, and click `View`
2. In the upper-right of the form, click `Cancel` or `Void` then `OK` to confirm your action
This will release the payment amount in Sezzle and update the Magento order status to Canceled if the Sezzle authorization has been released successfully or has already expired
According to Magento, `Void` should be used to release the current payment authorization and a new invoice can be generated, whereas `Cancel` both voids the authorization and places the order into a read-only state.
However, in Sezzle's case, both buttons operate the same way
### Order Verification in Magento Admin
1. Log in to Magento admin
2. Navigate to `Sales` > `Orders`, find the order to verify, and click `View`
| Order Status | Total Paid | Description |
| :----------- | :------------------------- | :------------------------------------------ |
| Processing | Grand Total | Payment was successfully captured by Sezzle |
| Pending | Does not equal Grand Total | Payment is authorized but not captured yet |
| Closed | N/A | Payment has been refunded |
| Canceled | N/A | Payment has been released |
### Order Verification in Sezzle Merchant Dashboard
1. Log in to Sezzle Merchant Dashboard
2. Navigate to `Orders`, then find and click the order to verify
| Order Status | Description |
| :----------------------------------------------------------- | :----------------------------------------------------------------------------------------------------- |
| Approved | Payment was successfully captured by Sezzle |
| Authorized, uncaptured | Payment was authorized but not captured yet |
| Refunded | Payment was refunded |
| Deleted due to checkout not being captured before expiration | Either the payment was not captured before the authorization expired, or the payment has been released |
### Customer Tokenization Details
Customer tokenization is currently unavailable.
Tokenized orders will always be pay-in-full.
1. Navigate to `Customers` > `All Customers`
* Select the customer to view tokenization details
2. If the customer is tokenized, the Sezzle tab will appear
* The `Status`, `Token`, and `Token Expiration` will appear on the tab
 ### Settlement Reports
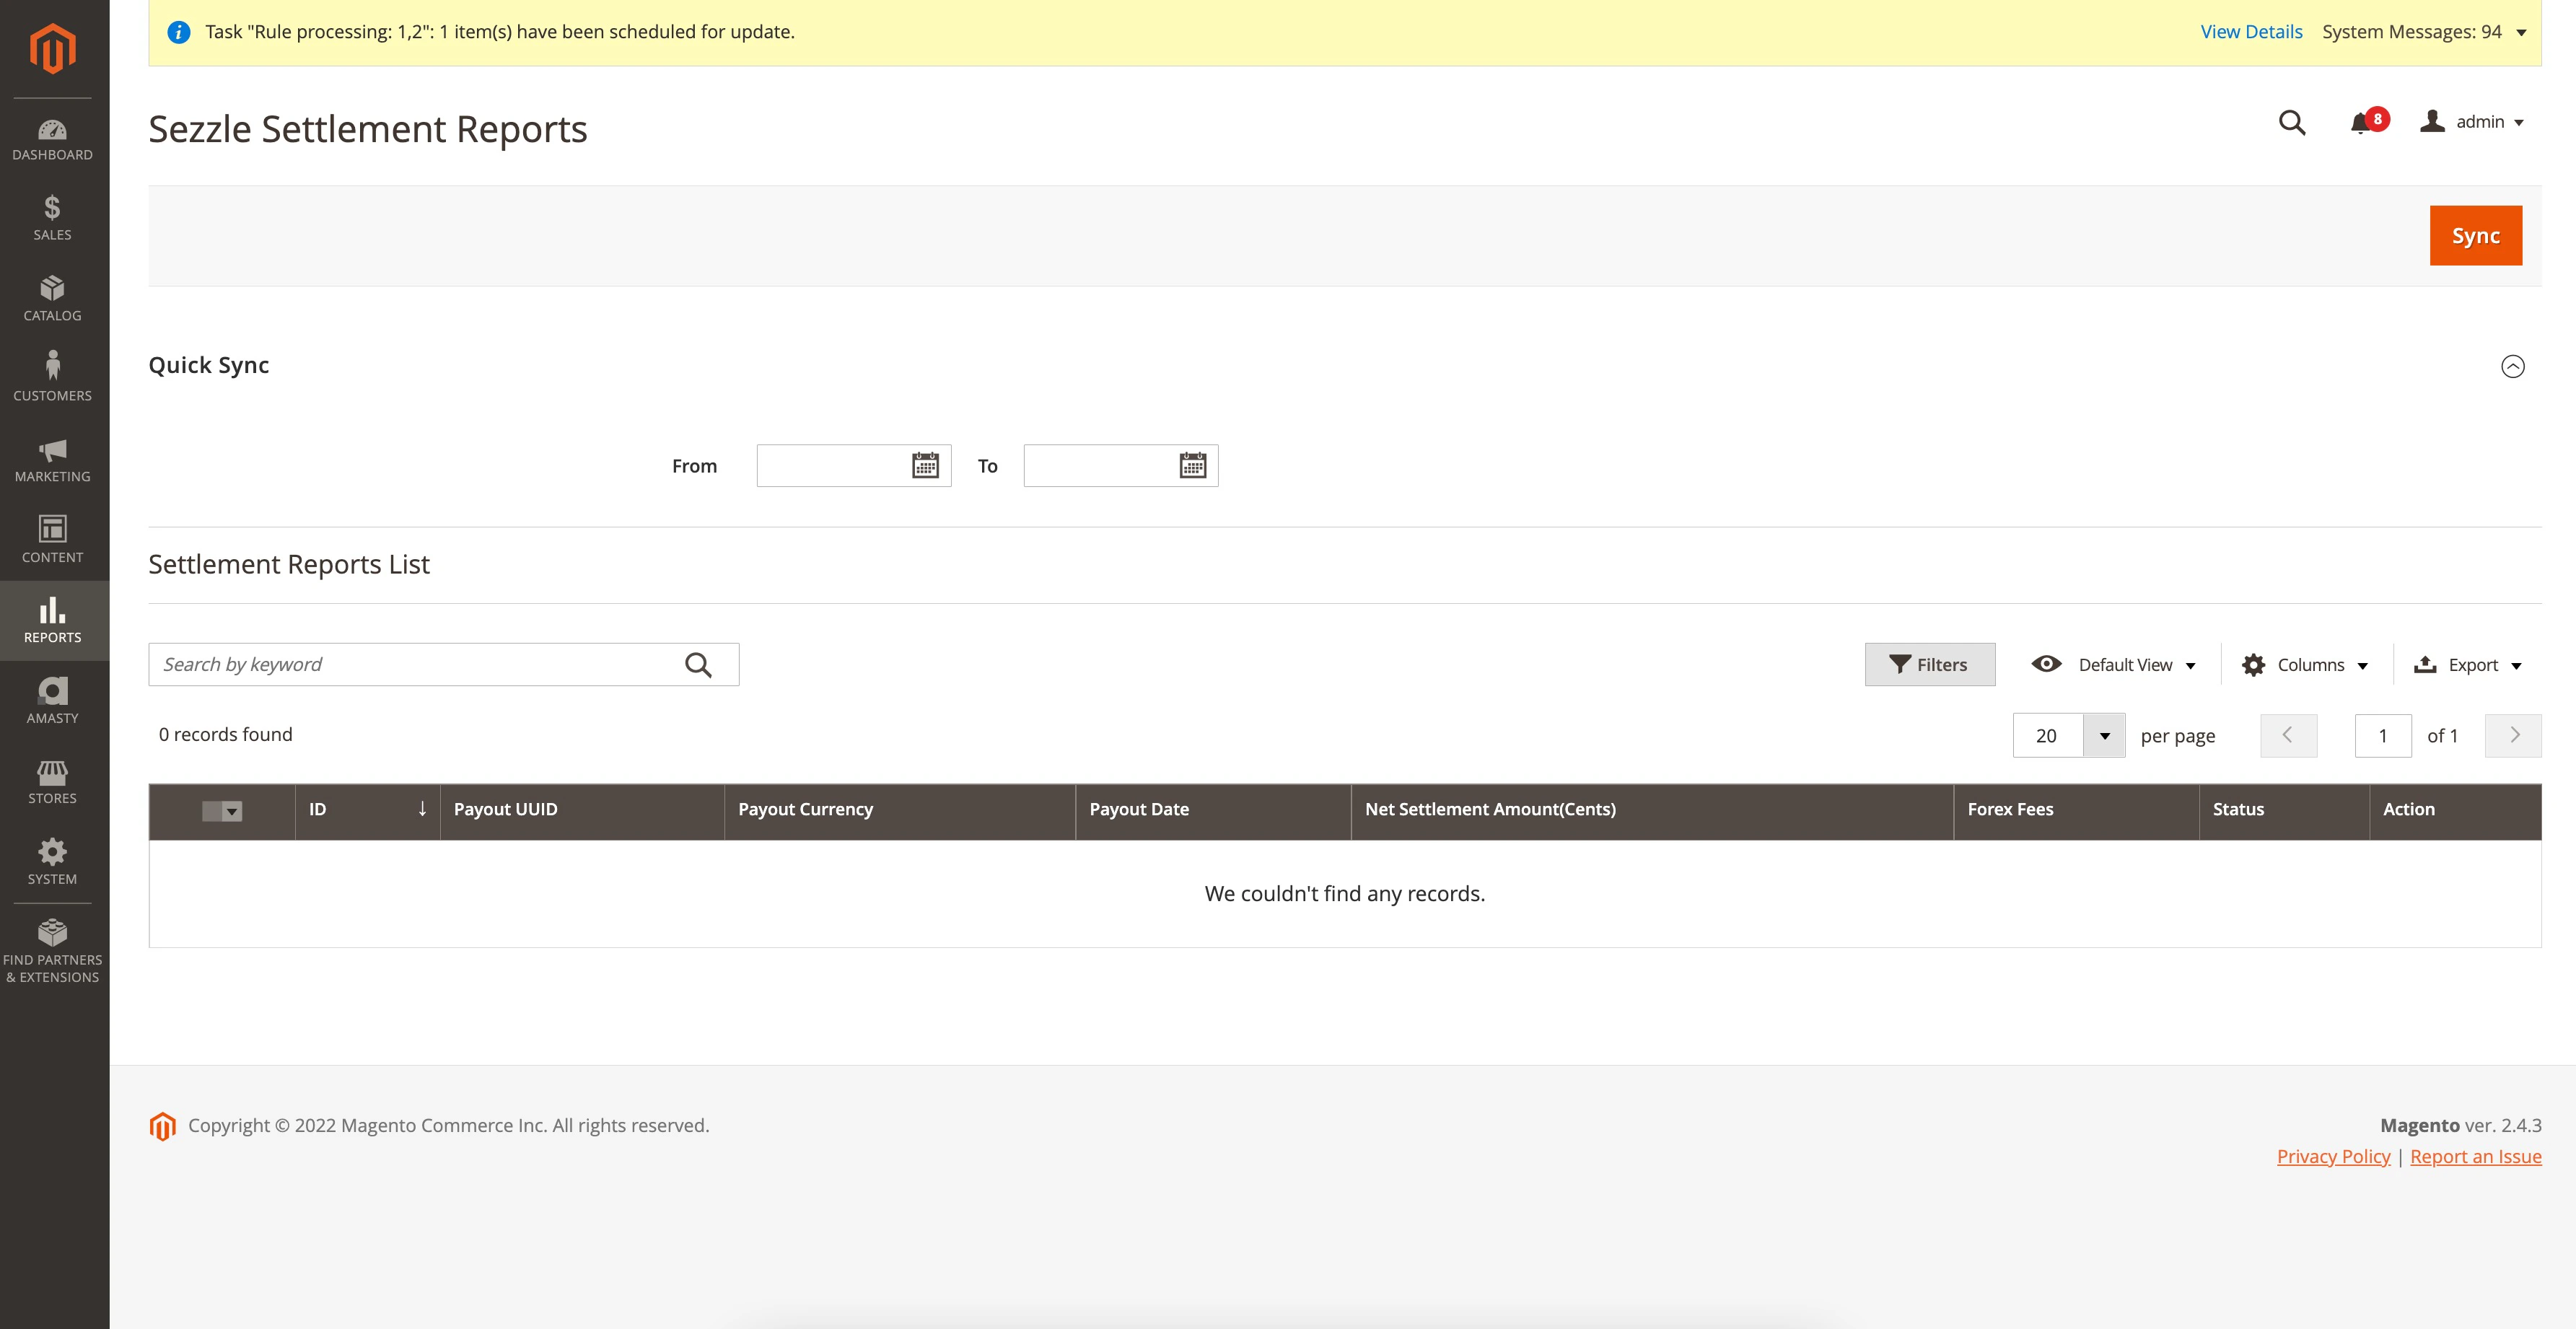
1. Navigate to `Reports` > `Sales` > `Sezzle Settlement`
* A list of recent Settlement Reports will be shown
2. To make a Quick Sync, enter the From and To Date and click `Sync`
3. To view details of a report, in the `Action` column, click `View`
4. To download a report, in the `Action` column, click `Download`
* You can download the Settlement Report in `CSV` or `Excel` format
### Settlement Reports
1. Navigate to `Reports` > `Sales` > `Sezzle Settlement`
* A list of recent Settlement Reports will be shown
2. To make a Quick Sync, enter the From and To Date and click `Sync`
3. To view details of a report, in the `Action` column, click `View`
4. To download a report, in the `Action` column, click `Download`
* You can download the Settlement Report in `CSV` or `Excel` format
 ## Troubleshooting
If testing was unsuccessful, review the following:
1. Sezzle-Magento2 extension is the latest version
2. Sezzle extension is enabled
1. Go to `Stores` > `Configuration` > `Sales` > `Payment Methods` > `Additional Payment Solutions`
2. Next to `Sezzle`, click `Configure`
3. Ensure `Enabled` is set to `Yes`
3. API Keys were entered correctly, and for the correct environment
It is recommended to use the Copy icon in the [Sezzle Merchant Dashboard](https://dashboard.sezzle.com/merchant/settings/apikeys) to avoid typos or extra spaces
4. Cache Storage was flushed
5. Widget script is present on your website and reflects the Merchant UUID from your [Sezzle Merchant Dashboard](https://dashboard.sezzle.com/merchant/settings/business)
1. Go to a product page on your website
2. Right-click then select `Inspect`
3. In the `Elements` tab, search for `widget.sezzle`
* If all the above checks failed, the merchant can forward the `/var/log/sezzlepay-YYYY-MM-DD.log` to the Sezzle team at [**merchantsupport@sezzle.com**](mailto:merchantsupport@sezzle.com)
* It is always recommended to also send the `system.log` and `exception.log `for better tracing of issues
## Troubleshooting
If testing was unsuccessful, review the following:
1. Sezzle-Magento2 extension is the latest version
2. Sezzle extension is enabled
1. Go to `Stores` > `Configuration` > `Sales` > `Payment Methods` > `Additional Payment Solutions`
2. Next to `Sezzle`, click `Configure`
3. Ensure `Enabled` is set to `Yes`
3. API Keys were entered correctly, and for the correct environment
It is recommended to use the Copy icon in the [Sezzle Merchant Dashboard](https://dashboard.sezzle.com/merchant/settings/apikeys) to avoid typos or extra spaces
4. Cache Storage was flushed
5. Widget script is present on your website and reflects the Merchant UUID from your [Sezzle Merchant Dashboard](https://dashboard.sezzle.com/merchant/settings/business)
1. Go to a product page on your website
2. Right-click then select `Inspect`
3. In the `Elements` tab, search for `widget.sezzle`
* If all the above checks failed, the merchant can forward the `/var/log/sezzlepay-YYYY-MM-DD.log` to the Sezzle team at [**merchantsupport@sezzle.com**](mailto:merchantsupport@sezzle.com)
* It is always recommended to also send the `system.log` and `exception.log `for better tracing of issues