> ## Documentation Index
> Fetch the complete documentation index at: https://docs.sezzle.com/llms.txt
> Use this file to discover all available pages before exploring further.
# Shopware 5
This guide explains how to add Sezzle as a payment option on your Shopware 5 website, enabling customers to use Sezzle at checkout. Additionally, it includes steps to upgrade existing integrations to the latest version of the plugin.
Sezzle's Shopware 5 plugin can be [downloaded from GitHub](https://github.com/sezzle/sezzle-shopware5).
### Install the Sezzle Shopware 5 Plugin
In the following section, `[Shopware]` refers to your Shopware 5 root directory.
#### Using the Composer
Go to the Shopware 5 installation directory, then run the below commands:
1. Open terminal and navigate to `Shopware` root path
2. Run the below command for the adding the plugin into your codebase
```
composer require sezzle/shopware5
```
#### Manual Method
1. Download the `.zip` or `tar.gz` file from Sezzle's GitHub repository
2. Unzip the file
3. Navigate to Shopware `[Shopware]/custom/plugins/` either through SFTP or SSH
4. Copy `SwagPaymentSezzle` directory from unzipped folder to `[Shopware]/custom/plugins/`
5. Log in to Shopware 5 Backend and navigate to `Configuration` > `Plugin Manager` > `Management` > `Installed`
6. Find `Sezzle` from the `Uninstalled` list and click on the `+` button to install the plugin
* Once installed, you will see `Sezzle` under `Inactive` list
7. Click on the `x` button to activate the plugin
* After successful activation, you will be able to see `Sezzle` under `Configuration` > `Payment Methods`
### Upgrade the Shopware 5 Plugin
#### Using the Composer
1. Change the version number of the `sezzle/sezzlepay` inside `composer.json`
2. Open terminal and navigate to `Shopware` root path
3. Run the following command for the updating the plugin to a newer version
```
composer update sezzle/sezzlepay
```
#### Manual Method
1. Download the `.zip` or `tar.gz` file from Sezzle's GitHub repository
2. Unzip the file
3. Delete the contents from `[Shopware]/custom/plugins/SwagPaymentSezzle`
4. Copy the contents of `SwagPaymentSezzle` directory from unzipped folder to `[Shopware]/custom/plugins/SwagPaymentSezzle/`
5. Log in to Shopware Backend and navigate to `Configuration` > `Cache/performance`
6. Flush the cache storage by selecting `Clear shop cache`
### Configure Sezzle
#### Payment Configuration
1. Make sure you have the Merchant UUID and the API Keys from the [Sezzle Merchant Dashboard](https://dashboard.sezzle.com/merchant/)
You must be registered with [Sezzle](https://dashboard.sezzle.com/merchant/signup) to access the Merchant Dashboard
2. Navigate to `Customers` > `Payments` > `Sezzle` > `Settings` in your Shopware Backend
3. Enable Sezzle by checking the `Enable` for this shop checkbox
4. Set the Public Key and Private Key
5. For testing, enable the Sandbox mode by checking the `Enable sandbox` checkbox
You can also verify your `API Keys` by clicking on the `Test API Settings`button
6. Set the Merchant UUID
7. Set the Merchant Location as per the store origin
8. Check the `Enable Tokenization` checkbox to enable customer tokenization in the Sezzle checkout
* If the customer agrees to be tokenized, then future checkouts for this customer will not require a redirect to Sezzle
* See [Customer tokenization](/docs/api/tokenization/intro)
9. Set `Payment Action` as `Authorize only` for doing payment authorization only and `Authorize and Capture` for doing instant capture
See [Authorize Only vs Authorize and Capture](/docs/guides/auth-and-capture) for details about the difference between the two choices
10. Check the `Enable Widget in PDP` checkbox to add the widget script and the Sezzle Widget Modal to the Product Display Page
11. Check the `Enable Widget in Cart` checkbox to add the widget script and the Sezzle Widget Modal to the Cart Page
12. Check the `Display errors` checkbox for showing up Sezzle related error code in the web URL on failure
13. Set `Logging` to `ERROR` to log only error messages or `ALL` to log all messages, including errors, warnings, and notices
14. Save the settings and clear the cache
 Your store is now ready to accept payments through Sezzle!
### Frontend Functionality
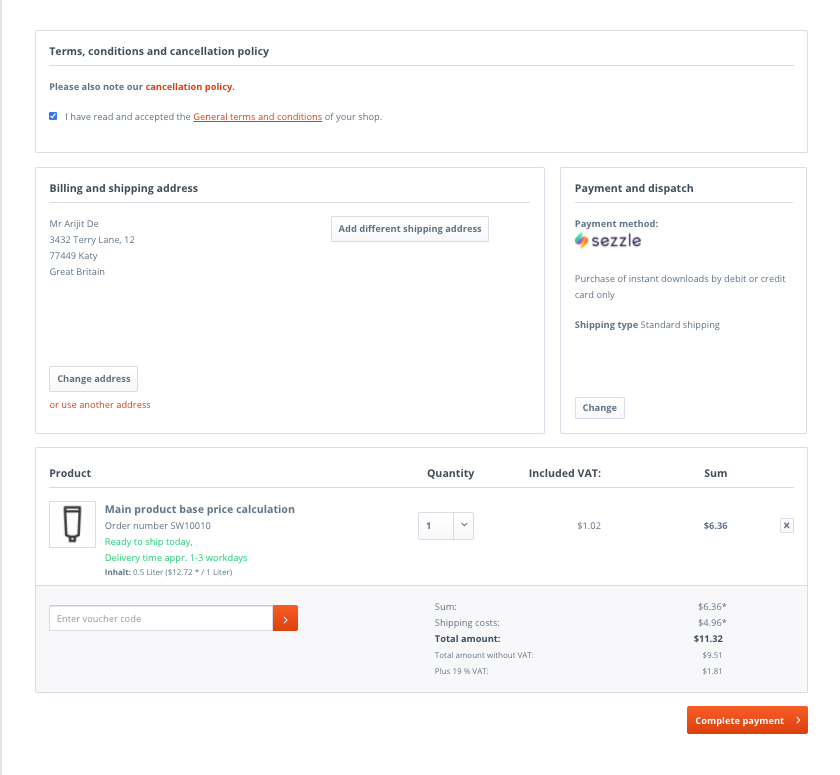
* If you have successfully installed the Sezzle plugin, then Sezzle will be included as a payment method in the checkout page.
1. Select `Sezzle` and continue
2. Once you click `Complete Payment`, you will be redirected to Sezzle Checkout to complete the checkout
If your account is already tokenized, skip the next two steps as you will not be redirected to Sezzle
3. \[Optional] On the final page of Sezzle Checkout, check the `Approve {Store Name}` to process payments from your Sezzle account for future transactions
* You may revoke this authorization at any time in your Sezzle Dashboard to tokenize your account
4. Click on `Complete Order` to complete your purchase
* On successful order placement, you will be redirected to the order confirmation page
Your store is now ready to accept payments through Sezzle!
### Frontend Functionality
* If you have successfully installed the Sezzle plugin, then Sezzle will be included as a payment method in the checkout page.
1. Select `Sezzle` and continue
2. Once you click `Complete Payment`, you will be redirected to Sezzle Checkout to complete the checkout
If your account is already tokenized, skip the next two steps as you will not be redirected to Sezzle
3. \[Optional] On the final page of Sezzle Checkout, check the `Approve {Store Name}` to process payments from your Sezzle account for future transactions
* You may revoke this authorization at any time in your Sezzle Dashboard to tokenize your account
4. Click on `Complete Order` to complete your purchase
* On successful order placement, you will be redirected to the order confirmation page
 ### Capture Payment
**If Payment Action is set to Authorize and Capture**
* Capture will be performed instantly from the plugin after order is created and validated in `Shopware`
**If Payment Action is set to Authorize**
* Capture needs to be performed manually from the `Shopware` backend. Follow the below steps to capture:
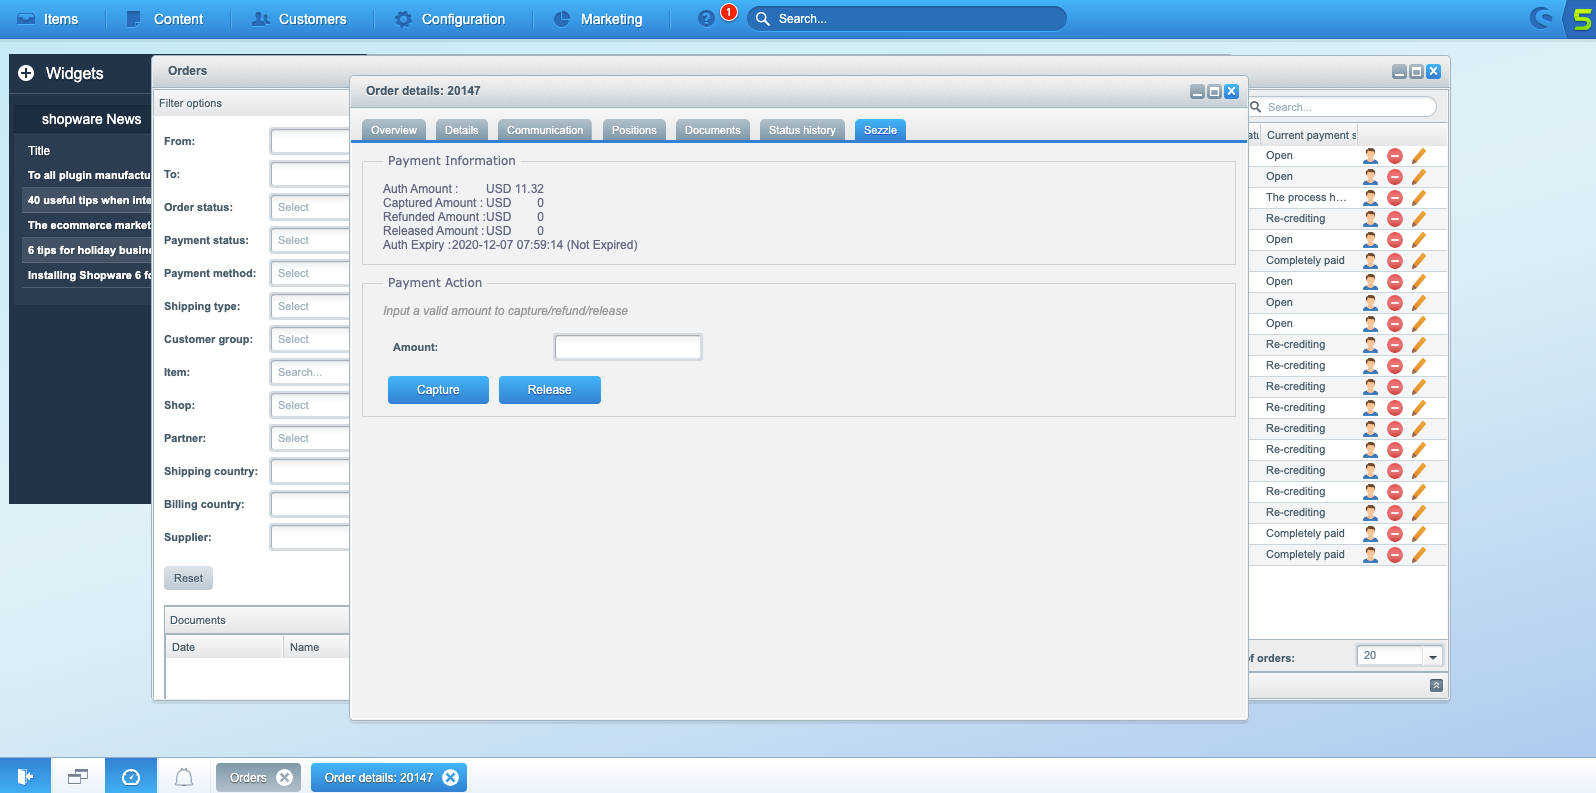
1. Go the order and click on `Sezzle` tab
2. Enter a value in `Amount` field
3. Click on `Capture` to capture the payment in Sezzle
### Refund Payment
1. Go the order and click on `Sezzle` tab
2. Enter a value in `Amount` field
3. Click on `Refund` to refund the payment in Sezzle
### Release Payment
1. Go the order and click on `Sezzle` tab
2. Enter a value in `Amount` field
3. Click on `Release` to release the payment in Sezzle
### Order Verification in Shopware Backend
Merchants should always check the payment status and amount of all orders. The following steps ensure that each action has been completed as expected.
1. Log in to Shopware admin and navigate to `Customers` > `Orders`
### Capture Payment
**If Payment Action is set to Authorize and Capture**
* Capture will be performed instantly from the plugin after order is created and validated in `Shopware`
**If Payment Action is set to Authorize**
* Capture needs to be performed manually from the `Shopware` backend. Follow the below steps to capture:
1. Go the order and click on `Sezzle` tab
2. Enter a value in `Amount` field
3. Click on `Capture` to capture the payment in Sezzle
### Refund Payment
1. Go the order and click on `Sezzle` tab
2. Enter a value in `Amount` field
3. Click on `Refund` to refund the payment in Sezzle
### Release Payment
1. Go the order and click on `Sezzle` tab
2. Enter a value in `Amount` field
3. Click on `Release` to release the payment in Sezzle
### Order Verification in Shopware Backend
Merchants should always check the payment status and amount of all orders. The following steps ensure that each action has been completed as expected.
1. Log in to Shopware admin and navigate to `Customers` > `Orders`
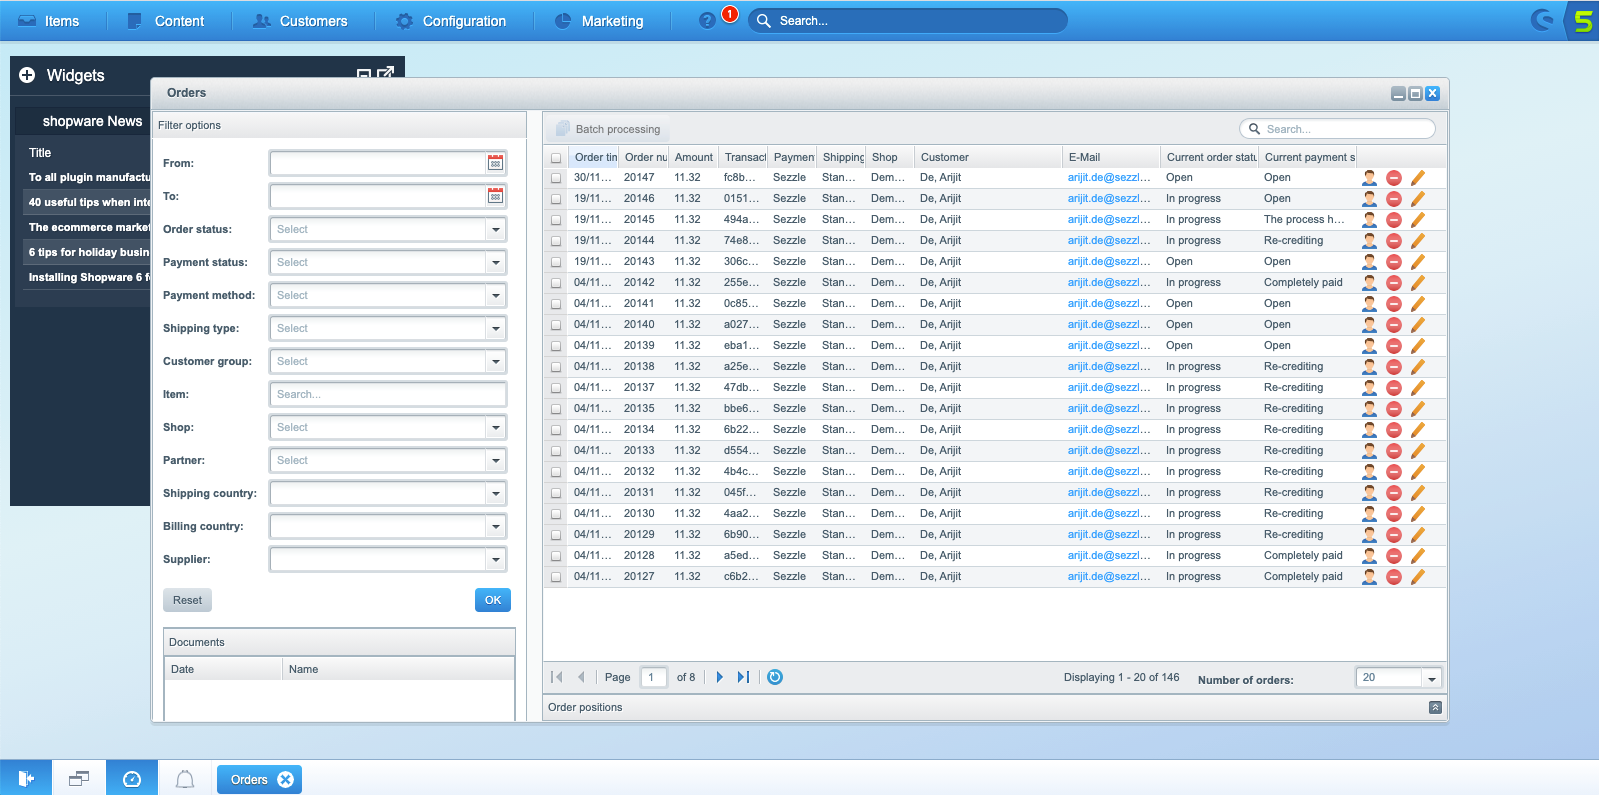 2. Proceed into the corresponding order
* Payment is **successfully captured** by Sezzle when
* `Current Payment Status` `=` `Completely Paid`
* `Capture Amount` `=` `Auth Amount`
* Payment is only **authorized** when
* `Current Payment Status` `=` `Open`
* `Auth Amount` `=` `Order Amount`
* `Capture Amount` `=` `0`
* Payment is **refunded** when
* `Current Payment Status` `=` `Re-crediting`
* `Refund Amount` `=<` `Capture Amount`
* Payment is **released** when
* `Current Payment Status` `=` `The process is cancelled for a full release or Open for a partial release`
* Amount will be deducted from `Auth Amount` and should appear in `Released Amount`
2. Proceed into the corresponding order
* Payment is **successfully captured** by Sezzle when
* `Current Payment Status` `=` `Completely Paid`
* `Capture Amount` `=` `Auth Amount`
* Payment is only **authorized** when
* `Current Payment Status` `=` `Open`
* `Auth Amount` `=` `Order Amount`
* `Capture Amount` `=` `0`
* Payment is **refunded** when
* `Current Payment Status` `=` `Re-crediting`
* `Refund Amount` `=<` `Capture Amount`
* Payment is **released** when
* `Current Payment Status` `=` `The process is cancelled for a full release or Open for a partial release`
* Amount will be deducted from `Auth Amount` and should appear in `Released Amount`
 ### Order Verification in Sezzle Merchant Dashboard
1. Log in to Sezzle Merchant Dashboard and navigate to `Orders`
2. Proceed into the corresponding order
| Payment Status | Description |
| :----------------------------------------------------------- | :---------------------------------------------------------------- |
| Approved | Payment successfully captured |
| Authorized, uncaptured | Payment authorized but not captured |
| Refunded or Partially Refunded | Payment refunded |
| Deleted due to checkout not being captured before expiration | Payment released or not captured before the authorization expired |
### Customer Tokenization Details
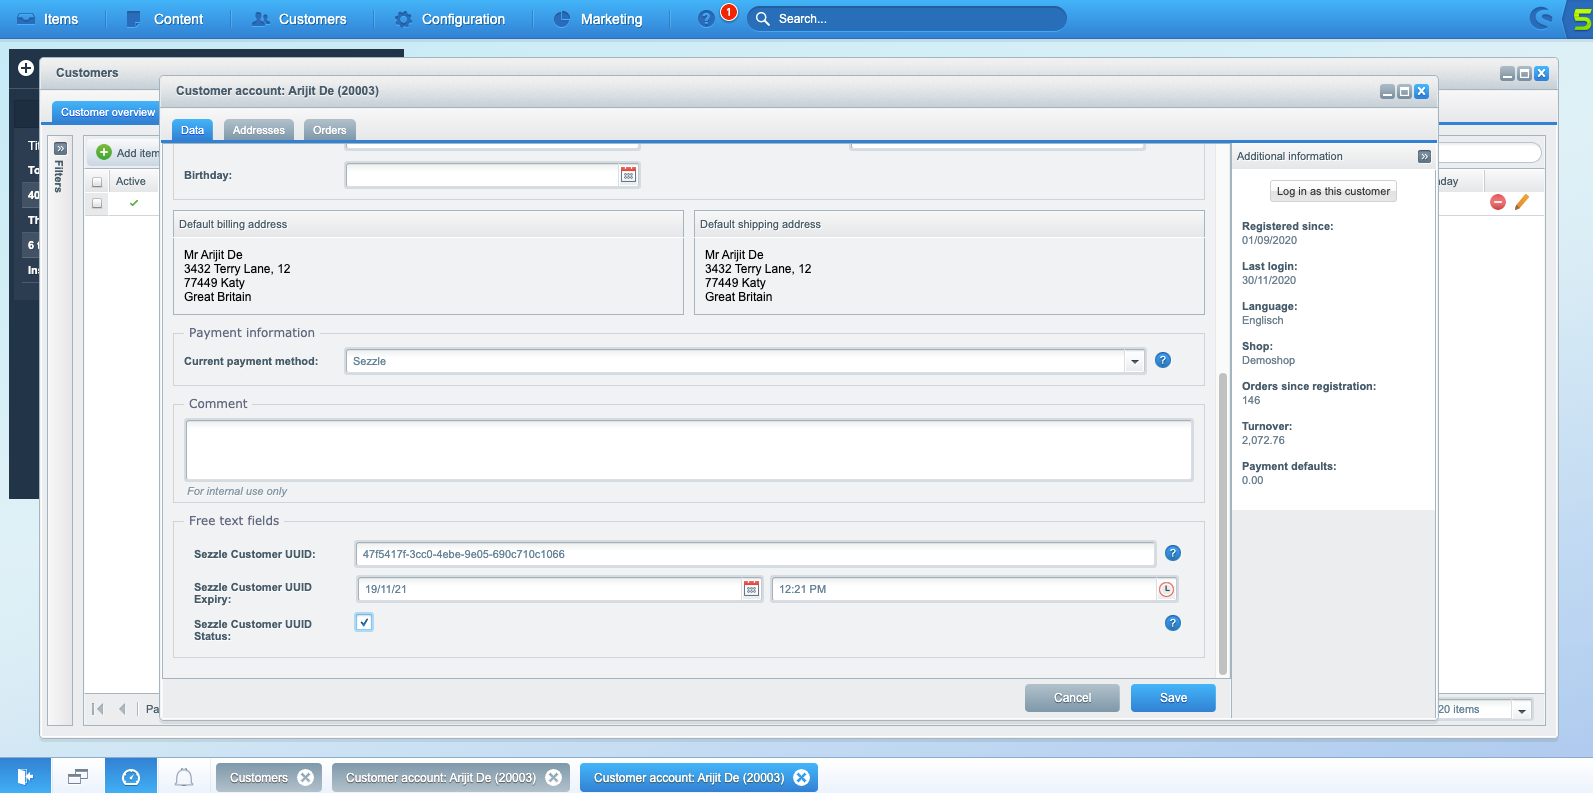
1. Log in to Shopware Backend and navigate to `Customers` > `Customers`
2. Select customer to view tokenization details
* `Sezzle Customer UUID`, `Sezzle Customer UUID Expiry` and `Sezzle Customer UUID Status` will appear under `Free text fields`
### Order Verification in Sezzle Merchant Dashboard
1. Log in to Sezzle Merchant Dashboard and navigate to `Orders`
2. Proceed into the corresponding order
| Payment Status | Description |
| :----------------------------------------------------------- | :---------------------------------------------------------------- |
| Approved | Payment successfully captured |
| Authorized, uncaptured | Payment authorized but not captured |
| Refunded or Partially Refunded | Payment refunded |
| Deleted due to checkout not being captured before expiration | Payment released or not captured before the authorization expired |
### Customer Tokenization Details
1. Log in to Shopware Backend and navigate to `Customers` > `Customers`
2. Select customer to view tokenization details
* `Sezzle Customer UUID`, `Sezzle Customer UUID Expiry` and `Sezzle Customer UUID Status` will appear under `Free text fields`
 ### Validate
Step through a [test checkout](/docs/api/test-cards#live-checkout-testing) to validate the integration is properly installed
### Troubleshooting
* `Sezzle` plugin creates logs of `Sezzle` action
* In the event that Merchant Success and Support teams are unable to resolve any issue, the Merchant may request that these logs be forwarded to the Platform Integrations team for further troubleshooting
* Logs are named as `plugin_dev-.log`
* To facilitate troubleshooting, we recommend sending the `core_dev-.log` as well
* Logs can be find in `[Shopware]/var/log/`
### Validate
Step through a [test checkout](/docs/api/test-cards#live-checkout-testing) to validate the integration is properly installed
### Troubleshooting
* `Sezzle` plugin creates logs of `Sezzle` action
* In the event that Merchant Success and Support teams are unable to resolve any issue, the Merchant may request that these logs be forwarded to the Platform Integrations team for further troubleshooting
* Logs are named as `plugin_dev-.log`
* To facilitate troubleshooting, we recommend sending the `core_dev-.log` as well
* Logs can be find in `[Shopware]/var/log/`